

Trying to wrangle schedules, mail, and daily chaos? Having a central spot for all of it just makes life smoother. A home command center is basically your household’s main hub where calendars, mail, keys, and important papers all hang out in one spot everyone can reach.
Setting up this space is easier than it sounds, and you don’t need fancy supplies—just some basics and a bit of planning.
You can build a command center in any high-traffic spot in your home. The kitchen, entryway, or mudroom usually work best since everyone passes through several times a day.
Some folks go all out with a full wall system—storage baskets, planning boards, the works. Others just want a couple of hooks and a calendar. Honestly, either way works if it fits your needs.
This guide covers how to pick the right location, choose a layout that actually fits, organize different zones, and add products that help (not just look cute).
You’ll figure out a setup that keeps your family on track, doesn’t hog space, and doesn’t empty your wallet.
Key Takeaways
- Pick a high-traffic spot and plan zones for calendars, mail, keys, and family tasks before you hang anything up
- Wall-mounted organizers, hooks, and dry-erase boards make daily items easy to see and grab
- Live with your setup for a week or two, then tweak it so it actually matches your family’s real-life habits
Understanding the Home Command Center
A home command center is the spot where you manage your household’s everyday chaos. It cuts down on mental clutter by keeping schedules, tasks, and key info all in one place.
Purpose and Benefits of a Command Center
With a command center, your family gets organized because everything you need to run the house lives in one spot. No more hunting through random rooms for calendars or mail.
It really does make life less stressful. You can see what needs to happen at a glance, and it’s way harder to miss appointments or forget bills when they’re staring you in the face.
Better communication is a bonus. Everyone can check the calendar and know who’s got what going on. Kids see their chores, adults coordinate without endless texts.
During those frantic mornings or evenings, you just grab what you need and check your tasks. No more rifling through drawers or pestering someone for info.
Key Elements for Effective Family Organization
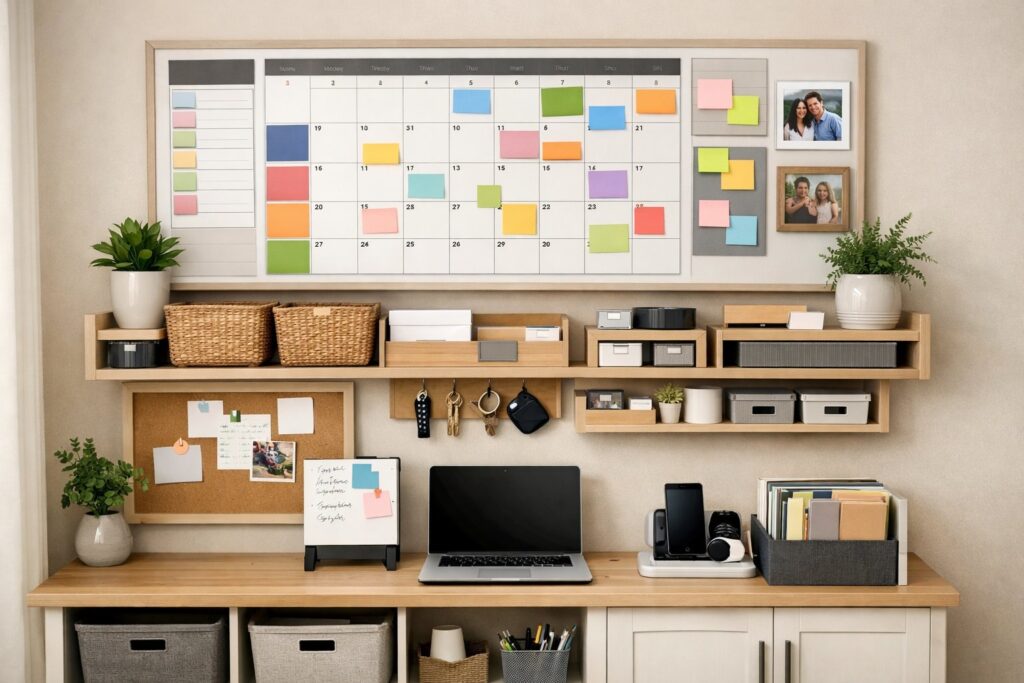
Visual calendar systems are the backbone here. A big monthly calendar lets everyone see what’s coming up, and using different colors for each person helps a ton.
Paper management tools are a must for keeping mail and documents from piling up. Sort things into categories—bills, school papers, stuff that needs action.
Task tracking boards make to-do lists impossible to ignore. Clipboards, whiteboards, or magnetic boards work for chores, groceries, and projects.
Essential supplies storage means pens, sticky notes, scissors, and stamps are always handy. A little caddy or cup does the trick.
Reference information like emergency contacts, WiFi passwords, and key phone numbers should stay close by. Laminate the sheet or pop it in a clear sleeve so it lasts.
Common Locations and Space Considerations
The kitchen wall near your main entrance is usually the winner for most families. High traffic means you’ll actually use it, and you see it coming and going.
Mudrooms and entryways work too since they’re already handling backpacks, coats, and all the coming and going. You can add hooks and baskets right alongside your boards.
You don’t need much space—just 2 or 3 feet of wall is enough. In small homes, try the back of a pantry door or a narrow hallway wall.
Good lighting is key so everyone can read what’s posted. Try not to put your command center somewhere it blocks traffic or just adds more clutter. You want it easy to reach, not an extra chore to visit.
Planning Your Command Center Layout
Getting your command center right starts with planning for your actual routines and space. The best layout is functional, easy to use, and doesn’t confuse anyone.
Assessing Your Family’s Needs
Start by watching what piles up around your house for a week. Where do people drop keys, backpacks, and mail? That’s what your command center needs to handle.
Think about how many people will actually use this space. A couple needs less storage than a family with four kids and a million activities.
Jot down your biggest headaches. Is it lost keys, missed appointments, scattered mail, forgotten school forms, or no central place for the grocery list?
Make a list of must-haves versus nice-to-haves. Maybe you need a calendar and mail sorter, but a charging station or pet basket could wait.
Selecting the Right Location
Pick a spot your family passes all the time. Kitchen, entryway, mudroom, or that hallway by the garage are all solid options. If you hide it in a spare room, no one will use it.
Measure the wall space before you buy anything. Even just 3 or 4 feet of width works for a basic setup. Wall-mounted organizers are great for saving floor space.
If you want to add charging or lighting, check for outlets nearby. Natural light is nice, but not a dealbreaker.
Try not to block traffic or cabinets with your setup. The area should feel open, not cramped or awkward.
Zoning and Accessibility
Break your command center into zones by function. That keeps clutter down and helps everyone find what they need fast.
Standard zones include:
| Zone Type | Purpose | Common Items |
|---|---|---|
| Scheduling | Track dates and tasks | Calendar, meal planner, activity schedule |
| Mail & Papers | Sort incoming documents | File baskets, mail slots, bill holder |
| Quick Access | Store daily essentials | Key hooks, phone charger, sunglasses tray |
| Supplies | Keep tools handy | Pens, sticky notes, stamps |
Put the stuff you use most at eye level, usually 48-60 inches from the floor. Use visual cues like labels or color-coded baskets so kids and guests can figure it out, too.
For little kids, keep their hooks or chore charts between 30-40 inches high so they can reach them without help. No climbing required.
Ergonomic and Aesthetic Considerations
If you want to write or sit at your command center, make sure surfaces and chairs are the right height. A small stool or chair is plenty for paying bills or helping with homework.
Leave 6-8 inches of space between items so the wall doesn’t look jam-packed. White space keeps the area calm instead of stressful.
Match your command center design to the rest of your home. Use similar colors and materials—wood for traditional, metal or acrylic for modern.
Install lighting if your spot is dim. Even a cheap LED strip or wall sconce makes it easier to read calendars and lists. Add a plant or a little art if you want the space to feel welcoming, not just utilitarian.
Designing Calendar and Scheduling Systems
A calendar system keeps everyone on the same page about activities, appointments, and responsibilities. Having the right mix of tools and organization makes tracking family schedules way easier and helps you avoid missing stuff.
Choosing Between Wall Calendars, Planners, and Digital Tools
A wall calendar is perfect as the main display since everyone can see it. Put it at eye level where people naturally gather. Big wall calendars give you space to write multiple events per day, and you get to see the whole month at once.
Personal planners are nice for detailed schedules that don’t need to go on the family calendar—think homework, work meetings, or private appointments.
Digital tools like shared phone apps can sync schedules instantly. They’re great, but not everyone checks their phone all the time, so pairing them with a physical calendar works best. Some families do both: wall calendar for the master plan, digital reminders for the details.
Setting Up Color-Coding Systems
Give each family member a color for all their activities on the calendar. That way, you can see who’s doing what without squinting at every entry. Pick up colored markers, stickers, or highlighters for this.
Write each person’s stuff in their color—maybe dad’s blue, mom’s green, each kid has their own. You could also color-code by activity: sports in red, medical in orange, school in purple.
Keep it simple. More than five or six colors can get confusing fast. Put a color key near the calendar so no one forgets which is which.
Creating Family Calendars and Chore Charts
Your family calendar should show everyone’s activities, appointments, and commitments. Add school holidays, sports, doctor visits, and work schedules. Update it weekly at a family meeting—trust me, it helps.
A chore chart tracks who does what and when. List daily chores like dishes and weekly ones like vacuuming. Add checkboxes so people can mark things done. It keeps everyone accountable and cuts down on nagging.
Put the chore chart next to the family calendar for easy reference. Add a to-do list section for one-time tasks. During family meetings, review both and shuffle tasks if schedules change.
Incorporating Storage and Organization Solutions
Good storage tools keep your command center working and stop clutter from taking over. Wall-mounted systems save space, bins and baskets wrangle loose items, and a spot for mail keeps things from vanishing.
Wall-Mounted File Holders and Organizers
Wall-mounted file holders can save counter space and keep important documents visible. You can mount metal or plastic organizers near your command center to hold bills, school papers, and medical forms.
These holders work well in kitchens or entryways if you have wall space to spare. Pick file holders with multiple slots, so you can separate different types of documents.
Label each slot with categories like “Bills to Pay,” “School,” or “Medical.” That way, finding what you need is a breeze.
Some wall-mounted organizers come with pockets or compartments for pens, notepads, and other small supplies. Look for ones with hooks at the bottom for keys or badges, keeping everything together and off your counters.
Using Bins, Baskets, and Clipboards
Bins and baskets help corral items that won’t fit in file holders. Small bins work for chargers, scissors, and sticky notes.
Bigger baskets can hold things family members need to grab on their way out, like library books or sports gear. Label each bin or basket with its contents or the owner’s name.
Clear bins let you see what’s inside, no digging required. Wicker or fabric baskets look nice and hide the mess.
Clipboards on the wall or inside cabinets make handy reference spots. Give each family member a clipboard for their schedules or permission slips.
Clipboards also work for meal plans or shopping lists you update often.
Sorting Incoming Mail and Important Papers
A mail basket or tray stops papers from piling up on counters. Place it in your command center as the spot for all incoming mail.
Sort through it daily or whenever you remember, just to keep things from getting out of hand. Set up a simple system with three categories: action needed, file, and recycle.
Tackle “action needed” items first, like bills or forms that need signatures. File important papers in your wall-mounted holder or a filing cabinet nearby.
Keep a paper shredder close for sensitive stuff you want to toss. It makes it easier to deal with mail right away, instead of letting it stack up.
Message Boards and Visual Communication
Message boards give everyone a shared spot for daily updates, reminders, and quick notes. The right visual tools cut down on repeated questions and keep info moving between family members.
Utilizing Whiteboards and Chalkboard Walls
Whiteboards are probably the easiest way to post messages that change every day. Jot down notes like “Soccer practice at 5 PM” or “Dinner with neighbors tonight” and wipe them off tomorrow.
Mount your whiteboard at eye level where everyone passes by. Chalkboard walls let you turn a whole section into a writing zone.
Paint a 3×4 foot area with chalkboard paint for about $15-20. It’s great for longer lists or when you want everyone to be able to write at once.
Keep some chalk and an eraser nearby, because you’ll need them. Product suggestion: Quartet Magnetic Dry Erase Board (17×23 inches) gives you a durable writing surface and magnets for hanging papers.
Assign certain areas on your whiteboard or chalkboard for different things. Maybe the top third is for the daily schedule, the middle for groceries, and the bottom for reminders.
Use different colored markers or chalk for each family member or type of message. It keeps things clear, or at least a little less confusing.
Bulletin Boards, Corkboards, and Sticky Notes
Cork boards are perfect for posting things you need to see but don’t change every day. Pin up permission slips, invites, sports schedules, or takeout menus.
A 24×36 inch corkboard gives you plenty of space without taking over your wall. Sticky notes fill the gap between permanent displays and quick messages.
Keep a pad of sticky notes next to your bulletin board for “Don’t forget” reminders. Try color-coding so each family member gets their own color.
Product suggestion: U Brands Cork Bulletin Board comes with a wooden frame and push pins, so you’re set to go.
Divide your corkboard into zones using ribbon, washi tape, or just draw lines. You might create spots for:
- Urgent items that need action now
- This week’s events like after-school stuff
- Reference materials like emergency contacts
- Fun items such as photos or quotes
Swap pushpins for small binder clips on hooks if you want a cleaner look that’s easy to update.
Designing Task Boards and Message Zones
Task boards turn to-do items into something you can actually see getting done. Make columns labeled “To Do,” “In Progress,” and “Done” on your board.
Write each task on an index card or sticky note and move it as you go. A message zone is your family’s main communication spot, so pick one area for messages between family members.
Product suggestion: Simple Houseware Wall Mount File Organizer with 6 compartments can double as a message center and mail sorter.
Set up visual systems that make sense at a glance. Use a red magnet on your whiteboard for urgent stuff.
Add a “Check This” section on your bulletin board for things that need attention right now.
Technology and Charging Station Integration
Today’s command centers need a spot for phones, tablets, and other gadgets. A solid tech zone keeps cords under control and your digital tools handy.
Setting Up Charging Stations for Devices
Start with a multi-port USB charging station that can handle a bunch of devices at once. Place it on a shelf or tuck it in a drawer in your command center.
Look for stations with 4-6 ports to cover all your family’s phones, tablets, and smartwatches. Mount the station near an outlet to avoid cords running everywhere.
A power strip with surge protection works as your base, protecting your devices and giving you enough outlets. If you have cabinet space, try a charging drawer.
Drill a hole in the back for the cord and line up your devices inside. This keeps charging hidden and cuts down on visual mess.
You could also use a decorative box or basket on your counter with the charging station inside. Product suggestions:
- Anker PowerPort 6 – Six-port USB charger for multiple devices
- Rev-A-Shelf Charging Drawer Insert – Built-in for cabinets
Managing Cables and Digital Tool Storage
Cable clips or adhesive cord organizers help route charging cables neatly along your wall or inside drawers. Velcro ties keep extra cable length bundled up.
Label each cable with small tags so everyone knows whose is whose. A cord cover or cable raceway hides wires running along your wall, and you can paint them to match your wall for a cleaner look.
Store extra cables and adapters in a small bin or drawer organizer. Use dividers or little pouches to separate by type, which stops the usual cord tangle.
Tips for Tech Zone Organization
Give each family member a designated spot for their devices. Small trays or labeled sections help prevent mix-ups, especially if everyone has similar phones.
Keep paper clutter away from your charging area. Tech and paper don’t mix well, and you need space to set down devices.
Mount a small shelf above your charging station for extra storage while devices charge. Check your charging station weekly, remove stuff that doesn’t belong, and clean off dust and debris.
Replace any damaged cables right away to avoid charging hassles.
Real-Life Examples and Product Recommendations
Seeing real command centers and specific products can help you figure out what actually works at home and which tools make organizing easier.
Sample Command Center Layouts for Different Spaces
A refrigerator command center is great for small apartments. Stick up a magnetic wall calendar, add small bins for pens, and clipboards for each person.
This setup doesn’t need wall space and keeps everything at eye level. In a narrow hallway, mount a vertical board about 12-18 inches wide.
Stack three clipboards for categories like school papers, bills, and activities. Hang small hooks underneath for keys and add a slim wall calendar beside the clipboards.
Kitchen command centers fit into 2-3 feet of wall space near the pantry or entrance. Use a big wall calendar in the middle, storage bins for mail sorting underneath, and a bulletin board and dry erase board on either side.
For mudrooms, pick one wall with cubbies at the bottom for shoes and bags. Mount your command center pieces above, like a wall calendar and clipboards with hooks for coats and backpacks.
Product Suggestions for Efficient Organization
The Quartet Dry Erase Calendar Board (24 x 18 inches) gives you a monthly view you can update easily. It comes with a marker and mounting hardware for around $25.
Acrylic wall-mounted clipboards keep papers visible and tidy. A set of three clear clipboards costs about $18 and works for sorting mail, school forms, and bills.
You can label each one with dry erase markers. The mDesign Metal Wire Wall Mount Storage Basket comes in sets of two for $20, attaches to walls, and holds supplies like pens, scissors, sticky notes, and charging cables.
The open design means you can see what’s inside right away.
Tips for Maintaining and Updating Your Command Center
Check your wall calendar every Sunday night to plan the week. Add all appointments, activities, and deadlines then.
Clear out outdated papers from clipboards and bins weekly to keep things from piling up. Empty your bins once a month and toss dried-up pens, old receipts, and papers you don’t need.
Return anything that’s wandered into the command center back to its real home. If your system stops working, change it up.
Add another clipboard if yours are always full, or switch to bigger bins. Replace your wall calendar at the start of each year, and move your command center if your family isn’t using it where it is.
Frequently Asked Questions
Setting up a home command center takes some planning and the right mix of calendars, storage, and layout. When you get it right, it really does make a difference for staying organized.
What are the essential components for a functional home command center?
Every command center needs a calendar to track schedules and appointments. Include a spot to sort mail and papers, like trays or wall pockets.
Add a pen holder with basics like sticky notes, scissors, and tape. A to-do list board helps track daily chores.
Post emergency contacts and important phone numbers where everyone can see them. A meal planner saves time, and a small charging station for devices keeps everything in one place.
How can you incorporate a calendar system into a command center for optimal family organization?
Mount a wall calendar at eye level in your command center. Pick a dry-erase, chalkboard, or big paper calendar that shows the full month.
Use different colored markers or stickers for each family member. It makes it easy to see who has what going on.
Write down all appointments, school events, work schedules, and social plans right away. Update the calendar once a week, maybe Sunday night.
Keep blank calendar pages or a backup calendar nearby for planning ahead.
What are some layout ideas for setting up an effective command center in a small space?
Use vertical wall space to get the most out of a small area. Mount a narrow shelf with hooks underneath for keys and bags.
One corkboard or magnetic board can hold your calendar, notes, and important papers. Add small command hooks on the side for clipboards or baskets.
The back of a pantry or closet door works in tight spots. Use over-the-door organizers with clear pockets for mail and papers.
A slim rolling cart fits in narrow spaces and holds supplies on a few levels. Wall-mounted file holders take up less room, and you can stack them vertically for different zones like mail, bills, and school papers.
What are the best storage solutions for organizing a home management center?
Wire baskets on the wall keep papers off the counter. Label each basket with categories like “To Pay,” “To File,” or “To Read” so you know exactly where things go.
Magazine holders are great for notebooks, folders, and slim binders. You can stand them upright and grab what you need without digging through a pile.
Small drawer units hide away supplies, which helps keep the area looking tidy. Clear acrylic trays let you spot what you need fast, and they’re perfect for grouping similar items together.
Mason jars or little containers work for pens, markers, and paper clips. Just line them up on a shelf and you won’t lose track of the small stuff.
Desktop file boxes with hanging folders sort paperwork by category or family member. Wall pockets made from fabric or plastic make it easy to grab the papers you use most.
Can you suggest a few products that enhance the usability of a wall command center?
The Quartet Magnetic Dry Erase Calendar Board goes right on the wall and comes with a monthly grid and space for notes. It’s 17 x 23 inches, and you get markers and magnets in the box.
The SimpleHouseware Mesh Desk Organizer has several compartments for mail, papers, and supplies. Set it on a counter or hang it up if you’re short on space.
The Yamazaki Home Tower Magnetic Storage Basket sticks to any magnetic board or surface. It’s handy for holding mail, keys, or other small things, and you don’t even need to drill holes.
What strategies can be used for integrating a drop zone into a home command center?
Put hooks at different heights so both kids and adults can actually reach them. Try installing about 4 to 6 hooks for coats, bags, and keys right by your command center.
Set a bench or even a small stool underneath the hooks. That way, people have a spot to sit and kick off their shoes.
Drop a shallow basket or tray on the bench to catch small stuff like sunglasses or wallets. It might sound simple, but it really helps keep things from vanishing.
Stick a shoe rack on the wall or slide a low shoe tray on the floor under the drop zone. This keeps shoes out of the main walkway and saves some sanity.
Give each family member their own cubby or bin for daily essentials. If you label each space with names or even photos, nobody has to guess where their things go.


