

Cleaning your bathroom every week might feel like a chore, but honestly, it doesn’t have to eat up your whole day. A simple weekly bathroom cleaning routine takes about 15 to 30 minutes and keeps germs, soap scum, and hard water stains from building up.
When you follow the same steps each week, the job gets faster and easier. You end up staying ahead of the mess instead of scrubbing away weeks of grime.
You don’t need fancy equipment or overpriced products to get your bathroom looking good. Basic things like a solid all-purpose cleaner, some microfiber cloths, and a toilet brush will do the trick for most jobs.
The trick is working in the right order and using a few smart moves that save you time and effort. This guide lays out what you need for a weekly bathroom cleaning routine that actually works.
You’ll find out which supplies to keep handy, what order to clean in, and how to cut down your cleaning time without skipping the important stuff.
Key Takeaways
- A weekly bathroom cleaning routine takes 15 to 30 minutes and prevents buildup of dirt and germs
- Working in the right order with basic supplies makes bathroom cleaning faster and more effective
- Time-saving strategies and the right products help you maintain a clean bathroom with less effort
Essential Cleaning Supplies and Tools
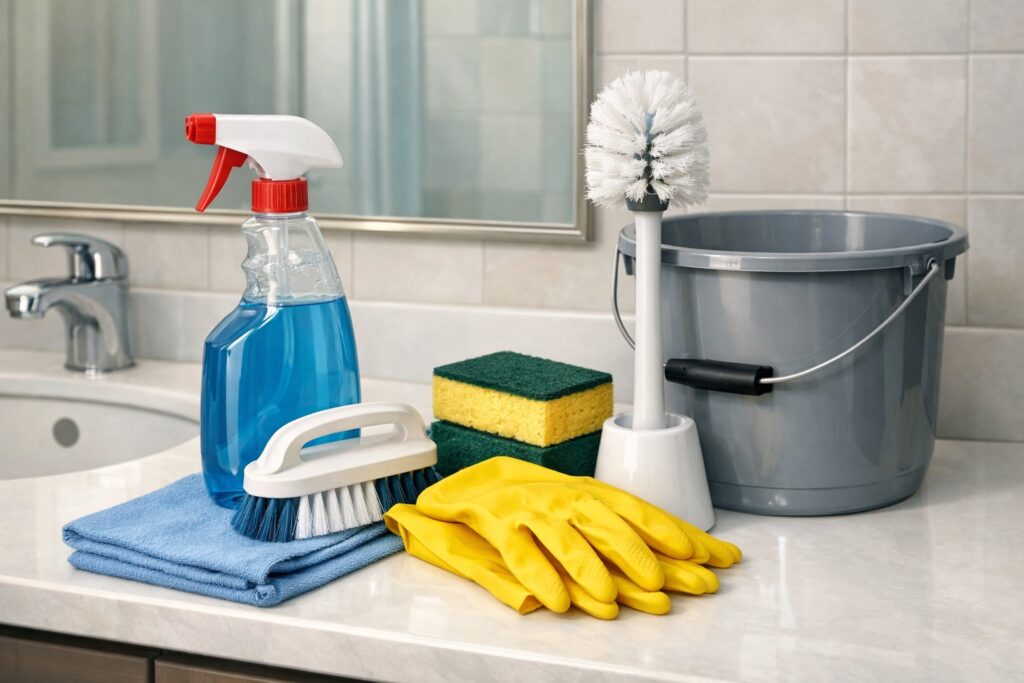
Having the right cleaning supplies makes your bathroom routine way easier. You just need basic products for different surfaces and tools that actually work.
Pick options that fit your budget and what you care about. No need to overthink it.
Must-Have Cleaning Products
Toilet bowl cleaner is a must for bathroom sanitation. Brands like Clorox Toilet Bowl Cleaner or Lysol Power Toilet Bowl Cleaner remove stains and kill germs.
All-purpose cleaner works on most bathroom surfaces, like counters, sinks, and tubs. You can use it in several areas without swapping bottles.
Glass cleaner keeps mirrors streak-free and clear. Use a clean cloth for the best results.
Disinfectant spray kills bacteria on things like door handles, faucets, and light switches. Look for one that works on hard and soft surfaces.
A bathroom cleaner made for soap scum and mildew handles shower walls and tubs better than a generic spray. You also need shower cleaner for weekly deep cleaning of tile and glass doors.
Products with bleach or hydrogen peroxide help prevent mold growth. Not a fan of strong chemicals? There are gentler options too.
Recommended Cleaning Tools
A sturdy toilet brush with firm bristles gets under the rim and removes stains. Swap it out every few months for hygiene.
Microfiber cloths are great for wiping any surface. They trap dirt and bacteria better than old rags. Try using different colors for different spots to avoid cross-contamination.
A scrub brush with stiff bristles handles grout lines and textured areas. Get one with a handle to protect your hands and reach tricky spots.
Rubber gloves keep your skin safe from chemicals and germs. Find a pair that fits well and gives you a good grip.
A squeegee stops water spots on shower doors and keeps them cleaner for longer. Use it after each shower if you can. A sponge with a rough side is handy for scrubbing soap scum off fixtures.
Eco-Friendly and Homemade Solutions
Baking soda is a gentle abrasive that removes stains without scratching. Mix it with water to make a paste for tubs and tiles.
White vinegar cuts through soap scum and hard water deposits naturally. Mix equal parts vinegar and water in a spray bottle for a solid homemade cleaning solution.
You can make your own toilet cleaner by mixing baking soda and vinegar right in the bowl. This combo fizzes and loosens buildup without harsh chemicals.
For mirrors and glass, mix one part vinegar with four parts water. Wipe with a microfiber cloth for a streak-free shine. These natural options are cheaper than store-bought stuff and cut down on chemicals in your home.
Step-by-Step Weekly Bathroom Cleaning Routine
A weekly bathroom cleaning routine goes smoother if you follow a set order, starting with dry tasks and moving to wet cleaning. This way, you avoid redoing work and finish faster.
Declutter and Prepare Surfaces
Clear everything off your countertops, shelves, and shower ledges before starting. Move soap dispensers, toothbrush holders, and decorations out of the way.
Empty the trash can and remove dirty towels and bath mats. Check under the sink and around the toilet for anything that shouldn’t be there.
This only takes a couple minutes but saves you hassle later. Put on rubber gloves to protect your hands.
Open a window or turn on the fan for some fresh air. Gather your cleaning supplies in a caddy so you can carry them around easily.
If your shower curtain liner looks dirty or has mildew, pull it down and toss it in the washing machine with a few towels. Let it wash while you clean the rest of the bathroom.
Dusting and Vacuuming
Start by dusting light fixtures, exhaust vents, and the top of your medicine cabinet. Use a microfiber cloth or duster so you actually catch the dust, not just move it around.
Work from top to bottom so dust falls to the floor, not onto freshly cleaned areas. Wipe down cabinet fronts and door handles with a dry cloth.
Check corners and baseboards for cobwebs or dust. Vacuum the bathroom floor to pick up hair, dust, and random debris.
Use the crevice tool along baseboards and behind the toilet. This dry step stops you from pushing dirt around when you mop later.
Empty the vacuum canister if it gets full or seems clogged. A quick vacuum now makes mopping way easier.
Cleaning and Disinfecting Surfaces
Squirt toilet bowl cleaner inside the bowl and let it sit while you clean other stuff. This gives it time to break down stains and kill germs.
Wipe mirrors and glass with glass cleaner and a clean microfiber cloth. Use circular motions and buff dry to avoid streaks.
You can also use a few drops of dish soap on a damp cloth for a fog-free finish. Clean the sink basin, faucet, and countertop with all-purpose cleaner or disinfecting spray.
Scrub around the faucet base where toothpaste and soap gunk collect. Rinse your cloth often and wipe everything dry.
Spray shower walls, the tub, and fixtures with a bathroom cleaner made for soap scum. Let it sit a few minutes, then scrub with a brush or sponge.
Focus on corners and around the drain where buildup happens fast. Rinse everything with warm water.
Scrub the toilet bowl with a toilet brush, reaching under the rim and around the waterline. Wipe down the outside of the toilet, including the tank, seat, lid, and base with disinfecting wipes or spray.
Don’t forget the flush handle, that’s a germ hotspot.
Final Touches and Reset
Mop the bathroom floor, starting from the far corner and working toward the door. Use a floor cleaner mixed with water or pre-moistened pads.
Get into corners and around the toilet base where grime sneaks in. Replace your clean bath mat and hang up fresh towels.
Put your stuff back on the counter and shelves. Refill soap dispensers if they’re almost empty.
Take out the trash and put in a new liner. Do a quick check for water spots on the faucet and mirrors.
The whole routine should take 15-25 minutes, depending on how big your bathroom is. Keep your bathroom cleaning checklist somewhere handy for next week.
Detailed Cleaning for Each Bathroom Area
Every part of your bathroom needs its own approach to get really clean. The main thing is to get rid of buildup, kill germs, and keep stains from coming back, using the right tools and methods.
Toilet Deep Cleaning
Start by squirting toilet cleaner inside the bowl, making sure to get under the rim. Let it sit for 5-10 minutes while you tackle other spots.
Use a toilet brush to scrub the whole inside of the bowl, especially under the rim where bacteria hide. Spray disinfectant on the handle, lid, seat (both sides), and outside of the bowl.
Wipe everything down with a microfiber cloth or paper towel. Don’t forget the base of the toilet, that’s where dust and grime build up.
For tough stains, sprinkle baking soda in the bowl before scrubbing. The mix of toilet cleaner and baking soda helps break down mineral deposits.
Clean the toilet brush holder too by rinsing it with hot water. It’s easy to forget but totally worth it.
Shower and Tub Maintenance
Spray shower cleaner or bathroom cleaner on all surfaces, including walls, doors, and fixtures. Let it sit a few minutes to break down soap scum and body oils.
Use a scrub brush for the tub and shower floor, since that’s where grime piles up. For grout lines, use a grout brush with bathroom cleaner to get rid of mildew and dirt.
Scrub in small circles along each line. Hard water stains on glass doors need extra attention with a cleaner made for mineral deposits.
Rinse everything well with warm water. Wipe down glass doors with a squeegee or dry cloth to stop new water spots from forming.
Sink and Faucet Care
Clean the sink basin with bathroom cleaner or a paste of baking soda and water. Scrub the whole surface, paying extra attention to the drain area where toothpaste and soap love to collect.
Baking soda is nice because it’s mildly abrasive but won’t scratch. Wipe down faucets with disinfectant spray to kill germs.
Use an old toothbrush to clean around the base of the faucet, where gunk hides. For hard water stains on chrome, wrap a cloth soaked in white vinegar around the faucet for 10 minutes, then wipe clean.
Dry fixtures with a clean cloth after each cleaning to keep water spots away. It’s a small thing but keeps your sink looking polished.
Mirror and Glass Polishing
Clean mirrors and glass with a few drops of dish soap on a damp microfiber cloth, or just use glass cleaner. Wipe in a circular motion first, then finish with vertical strokes to avoid streaks.
Use a dry microfiber cloth for the final polish. For a fog-free mirror, the dish soap trick leaves a thin protective coating.
Remove water spots with a mix of equal parts water and white vinegar. Spray lightly and wipe right away with a clean, dry cloth.
Clean mirrors weekly to stop buildup of hairspray, toothpaste splatters, and dust. Good lighting helps you spot any missed streaks or spots.
Cleaning Floors, Rugs, and High-Touch Areas
Bathroom floors pick up moisture and dirt fast, and bath mats trap water and germs. Light fixtures and exhaust fans need a wipe now and then to keep dust from messing with your air quality.
Floor Cleaning Techniques
Start by picking up anything on the floor. Sweep or vacuum to catch hair and debris.
Vacuuming really helps in corners and around the toilet base, where dust just loves to gather.
Mix your floor cleaner as the label says. Mop from the far corner, backing out toward the door.
Focus on spots near the toilet and sink since spills happen there a lot.
Let the floor air dry all the way before tossing bath mats back down. This keeps moisture from getting trapped and growing mold.
If you’re in a rush, crack a window or flip on the exhaust fan to speed things up.
Caring for Bath Mats and Rugs
Wash bath mats every week to get rid of soap scum, moisture, and bacteria. Check the care label, but most can go in the washer with regular detergent.
Give your bath rug a good shake before washing to get out loose hair and dirt. Wash with warm water, and toss in half a cup of white vinegar to fight odors and kill germs.
Skip the fabric softener, since it makes mats less absorbent. Hang mats up to dry fully instead of putting them back on a damp floor.
If you have more than one mat, swap them out weekly so each gets time to dry. Rotating helps keep them fresher.
Sanitizing Light Fixtures and Ventilation
Dust light fixtures with a microfiber cloth or duster once a week. Turn off the lights and let bulbs cool first if they’ve been on.
Wipe gently so you don’t damage delicate parts. For exhaust fans, clean them monthly by taking off the cover if you can and wiping away dust with a damp cloth.
A clean exhaust fan pulls out moisture better and helps stop mold. Use your vacuum’s brush attachment to reach dust inside the vent.
Wipe down light switches and doorknobs with a disinfectant wipe each week. These spots collect germs from everyone, so they need regular attention.
Time-Saving Strategies for Bathroom Cleaning
If you use the right approach, you can cut your bathroom cleaning time in half. Doing quick daily tasks and following a smart order really helps prevent dirt from piling up.
Efficient Cleaning Order
Clear off all surfaces, like toothbrushes and soap dispensers, before wiping anything down. This makes cleaning faster since you’re not dodging stuff.
Work from the top down. Dust light fixtures, then mirrors and windows, then counters, and finish with the floor.
Gravity is your friend here, since dust and debris fall as you go. Clean the toilet while other surfaces soak with cleaner.
Spray shower walls, then clean the sink while the spray works on soap scum. Use a toilet bowl cleaner that sits while you handle other things.
Keep all your cleaning supplies in a caddy you can carry. It saves trips back and forth for forgotten products.
Quick Daily Maintenance Tips
These little habits take less than two minutes but save you big headaches. Wipe your sink after brushing to get rid of toothpaste and water spots before they dry.
Squeegee shower walls after every use. It stops water stains and mildew, and honestly, it means less scrubbing later.
Hang towels so they can actually dry between uses. Damp towels get musty fast and end up needing more frequent washes.
Stash disinfecting wipes under the sink for quick counter and faucet touch-ups. If you see drips inside your toothbrush holder, give it a quick rinse.
Expert Product Suggestions
The right products make bathroom cleaning faster and easier. Good tools and cleaners help you get the job done with less effort.
Best Bathroom Cleaning Product Picks
Bar Keepers Friend is great for scrubbing tubs, showers, sinks, and toilets. If you’re into natural options, try baking soda mixed with Castile soap.
For an all-purpose cleaner, grab a multipurpose spray with vinegar if hard water spots drive you nuts. It’ll help with mineral buildup on fixtures and glass.
Hydrogen peroxide in a spray bottle works as a solid green disinfectant. It sanitizes without harsh chemicals.
For daily shower maintenance, mix a cup of water, half a cup of rubbing alcohol, and 10 drops of peppermint oil for a spray that keeps soap scum and mildew away.
Use streak-free glass cleaner on mirrors and chrome. It keeps them shiny without those annoying water marks.
Tools That Simplify Your Routine
Microfiber cloths are a must. Have at least three kinds: one for windows, one for counters, and a tougher one for scrubbing.
Keep extras so you can swap out for each product. A toilet brush with a holder should stay in every bathroom, so you’re not running around with one brush.
A microfiber deep clean mop cleans and disinfects floors with just water. It cuts out the need for extra floor products and speeds things up.
Add a handled microfiber duster for high spots, a big scrub brush for the tub and shower, and a shower squeegee to fight water spots. Store it all in a cleaning caddy so you can carry it from bathroom to bathroom.
Frequently Asked Questions
Keeping your bathroom clean every week brings up all sorts of questions about timing, tools, and what really works. Here are some answers to help you build a routine that fits your schedule and actually gets results.
What are the essential steps to maintaining a clean bathroom on a weekly basis?
Your weekly bathroom cleaning should follow a set order so you don’t double up on work. Start by grabbing all your supplies so you aren’t searching for things mid-clean.
Clear countertops and remove anything that doesn’t belong. Spray cleaner on the shower, tub, and toilet so it can sit while you work elsewhere.
Wipe mirrors and light fixtures first. Scrub the shower, tub, toilet bowl, and sink next.
Sweep or vacuum the floor to pick up hair and debris. Mop last with a damp mop and mild cleaner, focusing on corners and baseboards.
Which cleaning tools are necessary for an efficient weekly bathroom cleanup?
You don’t need a ton of tools to clean your bathroom well. A toilet brush with sturdy bristles handles the bowl, and a grout brush or old toothbrush gets into tight spots around faucets and tiles.
Microfiber cloths are your best bet for wiping surfaces and mirrors without streaks. Use different cloths for different areas to avoid spreading germs.
A squeegee quickly clears water from shower walls and glass doors, stopping water spots and soap scum. You’ll also want a mop with a washable head for the floors.
A spray bottle helps you mix your own solutions or spread store-bought cleaner evenly. A bucket is handy for carrying supplies and mixing mop water.
Can you recommend time-saving techniques for weekly bathroom cleaning?
Let cleaning products sit while you tackle other tasks to cut down on scrubbing. Spray the shower, tub, and toilet first, then wipe mirrors and counters while the cleaner works on grime.
Use a daily shower spray after each use to slow down soap scum and hard water stains. It means less scrubbing on cleaning day.
Keep a portable caddy with your cleaning supplies under the bathroom sink. You won’t waste time gathering things from all over the house.
Squeegee shower walls right after you shower. It only takes half a minute and saves you from tough scrubbing later.
What are the best cleaning products for a thorough weekly bathroom clean?
An all-purpose bathroom cleaner covers most surfaces, like counters, sinks, and tubs, without needing a bunch of different products. Look for one that cuts through soap scum and hard water stains.
For toilets, a thick disinfecting bowl cleaner sticks to the bowl and gets under the rim. Clorox or Lysol Toilet Bowl Cleaner both work well.
White vinegar mixed with water in a spray bottle cleans mirrors, fixtures, and glass shower doors. It removes water spots and leaves things streak-free without harsh chemicals.
If you want an eco-friendly option, Method Antibacterial Bathroom Cleaner uses plant-based ingredients. For tough mold and mildew, Tilex Mold and Mildew Remover targets the problem without much scrubbing.
How long should a typical bathroom cleaning session take each week?
Usually, a bathroom cleaning session takes 15 to 30 minutes if you stick to a routine. Small bathrooms with just a toilet, sink, and shower usually need about 15 to 20 minutes.
Bigger bathrooms with double sinks or separate tubs and showers take closer to 30 minutes. The first few times might take longer as you figure out what works best for your space.
Once you get into a groove, it goes faster because less dirt builds up between cleanings. If you’ve skipped a few weeks, though, plan on 45 minutes to an hour to catch up.
What is a good weekly schedule to keep your bathroom clean and fresh?
Pick a day each week for bathroom cleaning so it becomes a habit. Saturday or Sunday mornings often work since most people have more free time and the light’s better.
If weekends get packed, try a weeknight like Wednesday instead. That way, you can break up your week and avoid letting too much mess pile up.
Some folks with more than one bathroom will rotate which one they clean on different days. It spreads out the work and doesn’t feel as overwhelming.
Daily maintenance helps keep things fresher without much effort. Wipe down the sink and counter after your morning routine.
Squeegee the shower walls after you use them, and give the toilet bowl a quick brush every few days.


