back to top
Home Blog Page 3

Layered Lighting: A Detailed Guide to Creating a Cozy Home

0

A cozy home honestly starts with the right lighting, and the secret is using multiple light sources that work together instead of just blasting everything with one bright overhead fixture.

Layered lighting combines three types of light, ambient, task, and accent, to create depth, warmth, and the perfect atmosphere in every room.

This approach gives you control over how your space looks and feels at different times of day.

You don’t need expensive renovations to transform your home with better lighting.

Simple changes like adding warm-toned bulbs, placing lamps in the right spots, and including accent lights can make any room feel more inviting.

The right lighting design turns a basic space into somewhere you actually want to spend time.

This guide breaks down each layer of light and shows you exactly how to use them in your home.

You’ll pick up which fixtures work best for different rooms, how to choose the right bulbs, and which products give you the most value for creating that cozy feeling you’re after.

Key Takeaways

  • Layered lighting uses ambient, task, and accent light sources together to create warm and functional spaces
  • Warm-toned bulbs between 2700K and 3000K combined with dimmers give you the most control over your lighting plan
  • Strategic placement of multiple light sources in each room eliminates harsh shadows and adds depth to your home

Understanding Layered Lighting

Layered lighting uses three distinct types of light sources working together to make a room both functional and inviting.

This approach gives you control over brightness and lets you adjust the mood of any space throughout the day.

What Is Layered Lighting?

Layered lighting is a lighting scheme that combines three types of lighting in one room.

These three layers are ambient lighting, task lighting, and accent lighting, and each layer serves a specific purpose in your space.

Ambient lighting provides the general lighting for your entire room.

Task lighting focuses on specific work areas where you need brighter light.

Accent lighting highlights your favorite features like artwork or plants.

When you use all three layers together, you create a flexible lighting system.

You can turn different lights on or off based on what you’re doing.

A bedroom might use overhead lights for ambient lighting, a bedside lamp for reading, and a small spotlight to highlight a painting.

Benefits of the Layered Lighting Approach

The layered lighting approach gives you control over your home’s atmosphere.

You can adjust brightness levels to match different activities throughout the day.

Reading a book requires different lighting than watching a movie or hosting dinner guests.

This method also reduces eye strain and improves safety in your home.

Task lighting keeps you from working in shadows, while ambient lighting helps you move around safely at night.

The varied light sources eliminate harsh shadows and dark corners.

Your home looks more polished and intentional with layered lighting.

The depth created by multiple light sources makes rooms feel larger and more interesting.

You can highlight architectural details, create focal points, and add visual interest that a single overhead light just can’t do.

The Role of Ambient Lighting in Cozy Spaces

Ambient lighting forms the foundation of your home’s overall illumination and sets the mood for every room.

The right ambient light sources and proper control through dimmers let you adjust brightness levels to match different activities and times of day.

Ambient Lighting Explained

Ambient lighting provides general illumination that fills your entire room with light.

It serves as the base layer that lets you move safely through your space and see basic details without harsh shadows or dark corners.

This type of lighting comes from overhead fixtures that distribute light evenly throughout the room.

The goal is to create soft, comfortable brightness rather than intense, focused beams.

Your ambient lighting shouldn’t be too bright or too dim on its own.

The best ambient lighting mimics natural light in how it spreads throughout your space.

Think of it as the background glow that makes your room functional before you add other lighting layers.

Warm color temperatures between 2700K and 3000K work best for creating cozy environments because they produce a golden, inviting tone similar to sunset or candlelight.

Popular Ambient Light Sources and Fixtures

Ceiling-mounted fixtures offer the most common solution for ambient lighting in homes.

These include:

  • Recessed lighting, lights installed into your ceiling that sit flush with the surface
  • Flush mounts, fixtures that attach directly to the ceiling with minimal gap
  • Pendant lights, hanging fixtures that work well in rooms with higher ceilings
  • Chandeliers, decorative options that provide ambient light while serving as focal points
  • Downlights, fixtures that direct light downward to spread across floors and walls

Cove lighting creates indirect ambient light by bouncing illumination off your ceiling or walls.

This technique produces extremely soft, shadow-free light that feels natural and comfortable.

Ceiling fans with integrated lighting serve dual purposes by providing air circulation and ambient illumination.

Natural light from windows and skylights also counts as ambient lighting during daytime hours.

You should plan your artificial lighting sources to complement and extend the natural light you get throughout the day.

The Importance of Dimmers and Light Intensity

Dimmers give you control over your ambient lighting intensity to match different needs and moods.

A dimmer switch lets you reduce brightness during evening hours or bump it up when you need more visibility for tasks.

Installing dimmers on your ambient lighting fixtures gives you flexibility that fixed-brightness lights just can’t offer.

You can create bright, energizing light for morning routines and soft, relaxing light for evening wind-down time.

Light intensity really affects how cozy your space feels.

Too much brightness from your ambient lighting sources creates a clinical, unwelcoming atmosphere.

Too little light makes your room feel cave-like and uncomfortable.

Dimmers fix this problem by letting you find the perfect middle ground for any situation.

The ability to adjust your lighting fixtures means you can adapt one room to serve multiple purposes throughout the day without swapping bulbs or changing fixtures.

Task Lighting: Enhancing Function and Comfort

Task lighting targets specific areas where you need focused light for activities like reading, cooking, or working.

The right task lighting reduces eye strain and makes daily tasks easier while adding comfort to your space.

Defining Task Lighting and Its Uses

Task lighting provides concentrated light for specific activities that require clear visibility.

Unlike ambient lighting that fills a whole room, task lighting directs bright light exactly where you need it most.

You need task lighting in areas where you read, cook, work, or do hobbies.

In the kitchen, it helps you see what you’re chopping on the counter.

At your desk, it keeps you from squinting at paperwork or your keyboard.

Next to your bed, it lets you read without disturbing someone sleeping beside you.

The best task lighting uses warm, natural light that feels easy on your eyes.

Position the light so it shines directly on your work surface without creating harsh shadows or glare.

An adjustable fixture lets you move the light as needed for different tasks throughout the day.

Best Task Lighting Fixtures and Placement

Different rooms need different types of task lighting fixtures based on what you do in each space.

Desk lamps work well in home offices and study areas.

Choose one with an adjustable arm so you can point light where you need it.

Place it on the opposite side of your writing hand to avoid shadows on your work.

Under-cabinet lighting is essential in kitchens.

Under-cabinet LED strips or puck lights illuminate countertops where you prep food.

Install them toward the front of the cabinet to reduce shadows on your workspace.

Vanity lights belong in bathrooms near mirrors.

Mount them on both sides of the mirror at eye level to eliminate shadows on your face.

This setup works better than a single light above the mirror.

Reading lamps fit beside chairs or beds where you read.

Floor lamps with adjustable heads work great next to sofas.

Table lamps on nightstands should be tall enough that the bottom of the shade sits at shoulder height when you’re seated.

Product Suggestions for Task Lighting

BenQ e-Reading Desk Lamp offers adjustable brightness and color temperature with an auto-dimming sensor.

The curved head provides wide coverage without glare, making it ideal for desks and workspaces where you spend long hours.

Philips Hue Lightstrip Plus works as under-cabinet LED strips in kitchens.

These flexible LED strips stick beneath cabinets and connect to smart home systems.

You can adjust brightness and choose from millions of colors to match your mood or task needs.

Brightech Sky LED Torchiere Floor Lamp provides bright upward light that bounces off the ceiling for general illumination, but also includes a flexible reading lamp attachment.

This dual-function design gives you both ambient and task lighting in one fixture, perfect for living rooms or bedrooms where space is limited.

Accent Lighting: Adding Warmth and Personality

Accent lighting brings visual interest and emotional warmth to your space by highlighting specific features and creating focal points.

This layer lets you express your style while controlling the mood of each room through strategic placement and color temperature choices.

Purpose and Benefits of Accent Lighting

Accent lighting draws attention to specific elements in your home while adding depth to your overall lighting scheme.

Unlike ambient lighting that illuminates entire rooms, accent lights create visual hierarchy by spotlighting what matters most.

This lighting layer eliminates flat, sterile spaces by introducing shadows and highlights.

You can use it to showcase artwork, architectural details, plants, or textured walls.

The contrast between lit and unlit areas adds dimension that makes rooms feel larger and more dynamic.

Accent lighting also works as mood lighting during evenings.

When you dim or turn off your ambient and task lights, accent lights alone can create a relaxing atmosphere.

Warm-toned accent lighting between 2000K and 2700K produces a cozy, inviting feeling that works well for unwinding after work.

Accent Lighting Techniques and Examples

Wall sconces work well on either side of artwork, mirrors, or fireplaces.

Install them at eye level, typically 60 to 66 inches from the floor.

Sconces add both uplight and downlight, creating gentle shadows that enhance texture on walls.

Picture lights mount directly above frames to illuminate artwork without glare.

These small fixtures focus attention on specific pieces and work best with a beam angle between 25 and 40 degrees.

Track lighting and spotlights offer flexibility for renters or people who like to change displays often.

You can adjust the direction of each light head to highlight different features as needed.

Aim for three times more light on your accent feature than the surrounding ambient light.

LED strip lights installed under shelves, inside cabinets, or behind furniture create subtle glows that add warmth without harsh brightness.

These strips work particularly well for highlighting collections or creating backlighting effects.

String lights or fairy lights provide soft, decorative accent lighting in bedrooms, reading nooks, or outdoor spaces.

While less focused than other options, they contribute to a relaxed, casual atmosphere.

Recommended Accent Lighting Products

Product TypeBest ForKey Features
Adjustable Wall SconcesLiving rooms, hallwaysDirectional heads, dimmer compatible, multiple finish options
Wireless Picture LightsArt galleries, entrywaysBattery-powered or rechargeable, no wiring required, adjustable brightness
Smart LED Strip LightsUnder cabinets, behind TVsColor-changing capability, app control, cuttable to custom lengths

Try to find dimmable accent lights so you can tweak the intensity as the day goes on. Fixtures with warm color temperatures work best for living areas and bedrooms.

Put accent lights on separate switches from your main lighting, so you can control each layer on its own. Think about the size of what you want to highlight before picking a fixture.

Bigger artwork needs a wider beam, while smaller objects look better with narrow, focused beams. That way, you won’t get light spilling where you don’t want it.

Essential Lighting Design Principles for Coziness

The right lighting can turn a plain room into a warm retreat. Color temperature shapes the mood, and the bulbs and controls you pick give you flexibility.

Balanced light helps you avoid harsh spots, which nobody really wants. Let’s talk about how that all comes together.

Color Temperature and Its Impact on Mood

Color temperature tells you how warm or cool your light looks, measured in Kelvin (K). Warm light, somewhere between 2700K and 3000K, gives you that cozy feeling people crave at home.

This range feels like candlelight or firelight, which most brains connect with comfort and safety. If you go above 4000K, the light gets pretty cool and works better in garages or work areas, but it’s not great for relaxing spaces.

Bedrooms and living rooms really need those warmer bulbs to feel inviting. Kitchens can handle a slightly cooler range, maybe 3000K to 3500K for prepping food, but keep dining areas on the warmer side.

Color-changing LED bulbs can help you shift temperatures throughout the day. Set cooler tones in the morning to wake up, then switch to warmer tones as you wind down.

This approach lines up with your natural rhythms. It just feels right for whatever you’re doing.

Choosing the Right Bulbs and Controls

LED bulbs give you the best mix of efficiency and good light. Look for ones labeled “soft white” or “warm white” if you want that cozy vibe.

Smart bulbs and smart lighting systems let you control brightness and color temperature from your phone. You can set up scenes for movie night, dinner, or reading, which is pretty fun.

If you don’t want to mess with apps, dimmer switches work well too. Just keep things simple if that’s your style.

Light intensity matters a lot. Your main lighting should be bright enough to see but not so bright it feels like a waiting room.

Task lighting needs to be stronger for reading or cooking. Accent lighting should stay lower, just enough to add some depth.

Preventing Glare and Creating Balance

Glare happens when light shines right in your eyes or bounces off shiny stuff. Place lamps so bulbs sit below your eye level when you’re sitting down.

Lampshades or frosted bulbs help soften harsh light. Using more than one light source at different heights keeps your space from looking flat or shadowy.

Floor lamps in corners, table lamps on side tables, and wall sconces at mid-height spread light around more evenly. It’s a simple trick, but it works.

Skip bright white walls or glossy finishes near your lights. They bounce too much light and can get uncomfortable.

Matte surfaces and warm paint colors absorb some of that brightness, making everything feel softer.

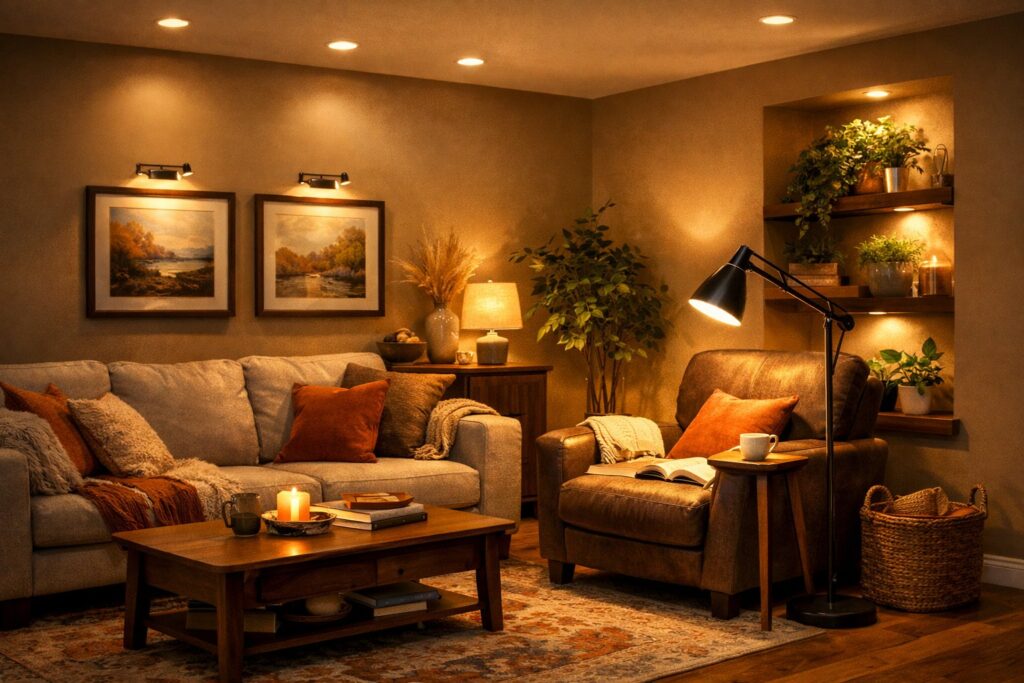
Layering Light in Key Rooms of the Home

Each room needs a different lighting approach, depending on how you use it. Mixing ambient, task, and accent lights helps every space work better and feel more inviting.

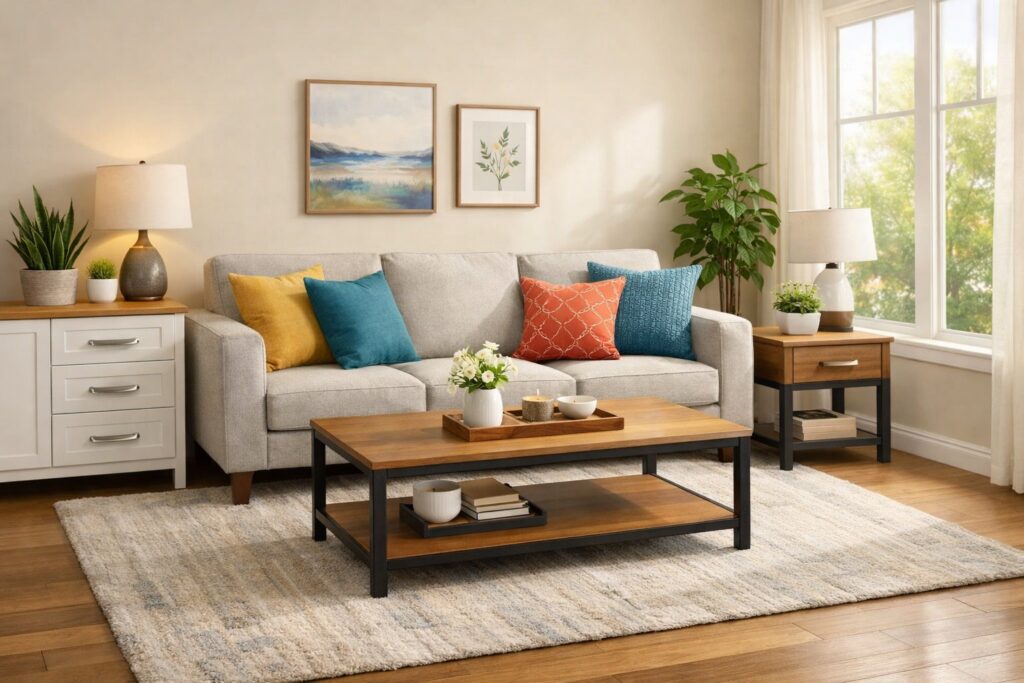
Living Room Lighting Strategies

The living room has to do a lot, so flexible lighting is key. Start with a ceiling fixture for overall light, but don’t lean on it alone.

That kind of lighting can feel flat and unwelcoming. Add floor lamps next to seats for reading or working.

Put table lamps on side tables to create cozy pools of light around the edges. These task lights let you see clearly but keep the vibe relaxed.

Wall sconces are great for highlighting artwork or interesting features. Picture lights can draw eyes to wall decor.

Rechargeable lamps on coffee tables or shelves add soft light in unexpected spots. Try placing lights at different heights to add depth and make the room feel bigger.

Keep pendant lights about 75 cm above surfaces to avoid glare and keep sightlines open.

Kitchen Lighting Layering

Kitchen lighting needs to be bright for prepping food, but you also want it to feel inviting. Use recessed spotlights or ceiling pendants for the main layer.

Track lighting works if you have skylights. Under-cabinet lights are a must for shadow-free task lighting on countertops.

These make chopping and cooking safer and easier. Hang statement pendants over islands or tables, at least 75 cm from the surface.

Accent lighting inside glass cabinets with LED strips or small spotlights shows off your dishes and adds warmth. Strip lights on open shelves do the same thing.

Don’t light the whole kitchen evenly. Create zones instead.

Put task lights where you work, and use decorative fixtures over eating areas. Wire each light type on separate circuits so you can adjust them as needed.

Bedroom Lighting for Relaxation

Bedroom lighting should be softer since this is where you relax and sleep. Go for a chandelier if you have high ceilings, or a flush mount fixture for standard heights as your main light.

Keep the brightness lower than in active rooms. Install reading lights next to the bed for your task layer.

Wall-mounted fixtures, pendants, or headboard lights all work. Table lamps on nightstands add a warm glow without being too intense.

If you do makeup in your bedroom, light your dressing table from the sides. This keeps harsh shadows off your face.

A mirror with built-in LEDs spreads out soft, flattering light. Add LED strips inside wardrobes so you can actually see your clothes.

Try hiding linear LEDs behind crown molding to wash light across the ceiling. It makes the room feel taller and adds gentle ambient light.

Frequently Asked Questions

Getting layered lighting right means knowing how each type works in your rooms and picking fixtures that fit your needs and style.

How can I effectively combine ambient, task, and accent lighting for a balanced home atmosphere?

Start with ambient lighting as your base to light up the whole space. Put it on a dimmer switch so you can adjust as needed.

Add task lighting where you do specific things, like reading or cooking. Place these lights to the side of your work area to avoid shadows.

Layer in accent lighting at about three times the brightness of your ambient lights. This contrast makes features pop. Make sure each lighting type has its own control so you can tweak things for different activities or moods.


What are some prime examples of accent lighting fixtures I could consider for my living room?

Track lighting lets you point light at multiple focal points, like art or cool architecture. You can adjust the heads to hit different spots.

Picture lights above frames give your wall art a gallery look. Wall sconces that wash light up or down highlight textures or details.

Directional spotlights focus on specific things like plants, sculptures, or bookcases. These add depth and contrast to the room.


Could you give me practical task lighting ideas for a home office space?

A desk lamp with an adjustable arm lets you aim light exactly where you want it. Put it to the side of your workspace to keep shadows off your keyboard or papers.

Under-shelf lighting brightens your desk without taking up space. LED strips are great for this.

If you’re on a computer, don’t put lights directly behind your monitor. That just creates glare. Use lights that spread even illumination across your desk from the side or above at an angle.


What is the best way to set up a lighting scheme that enhances the coziness of a bedroom?

Use warm-toned ambient lighting with a dimmer as your main source. Lower the brightness in the evening to help your body get ready for sleep.

Add bedside reading lamps or wall sconces for task lighting. Place them so the light hits your book or tablet, not your eyes.

Try accent lighting like LED strips behind the headboard or under the bed for a soft glow. Small table lamps on dressers also work as gentle accent lights, adding warmth without being overpowering.


Can you suggest a few lighting products that are both functional and stylish for my kitchen refurbishment?

Install under-cabinet LED strips to light up counters for food prep. They give you direct light without the shadows from overhead fixtures.

Pendant lights over the island combine task and ambient lighting and also look great. Go for adjustable heights so you can set them about 30 to 36 inches above the counter.

Recessed can lights with dimmers offer flexible ambient lighting all over the kitchen. Brighten them for cooking, dim them for dining or hanging out.


What kind of lighting is recommended for a reading nook to reduce eye strain and create a relaxing environment?

A floor lamp beside your chair is a solid choice for focused reading light. Try to find one with a shade that points light down onto your book and keeps the bulb out of your line of sight.

Adjustable reading lamps are handy since you can tweak the angle or height whenever you want. Warm bulbs, somewhere in the 2700K to 3000K range, usually feel more inviting for reading.

You want enough light to read comfortably, but not so much that the page glares back at you. Lamps with three-way bulbs or a dimmer switch make it easy to dial in just the right brightness.


Stylish Home Decor Ideas That Are Pet‑Friendly: Fabrics, Furniture & More

0

Living with pets doesn’t mean you have to give up on having a beautiful home. A lot of pet owners think stylish decor and furry companions can’t coexist, but honestly, it’s more doable than you might expect.

With the right fabric selections, furniture choices, and smart layout planning, you can create a home that looks magazine-worthy while standing up to paws, claws, and the occasional accident.

The real trick is picking materials that actually work for your lifestyle. Durable doesn’t have to mean ugly, and pet-safe doesn’t mean you have to ditch your style.

Microfiber sofas resist stains, and hardwood floors handle scratches. Modern options let you design spaces that serve both you and your pets.

This guide will walk you through practical fabric picks, furniture that lasts, layout strategies that make sense, and cleaning tips that actually save you time.

You’ll also find some specific product ideas that blend durability with good looks. You really can have both a stylish home and happy pets under one roof.

Key Takeaways

  • Select scratch-resistant furniture and stain-proof fabrics like microfiber and leather to maintain style while handling pet wear
  • Design dedicated pet zones with built-in feeding stations and sleeping areas that blend with your existing decor
  • Choose durable flooring options like luxury vinyl plank and porcelain tile paired with medium-toned colors to hide pet hair effectively

Essential Elements of Pet-Friendly Home Decor

Pet-friendly design is all about picking materials that can handle daily wear from animals. At the same time, you want your space to stay clean and attractive.

The right choices make an environment where both pets and people feel comfortable. Nobody wants to stress about messes all the time.

What Defines Pet-Friendly Design

Pet-friendly design puts durability, easy maintenance, and pet comfort first, but it doesn’t mean you have to give up on visual appeal. The focus is on materials and layouts that can handle scratching, shedding, and accidents, but still look intentional and pulled together.

Key characteristics include:

  • Scratch-resistant surfaces that maintain their appearance
  • Stain-repellent fabrics and finishes
  • Washable materials for quick cleanup
  • Strategic furniture placement that accommodates pet movement
  • Integrated pet zones that blend with your overall aesthetic

It’s worth paying attention to your pet’s actual habits before you start buying stuff. Where do they sleep, scratch, or play most often?

This kind of info helps you invest in solutions that actually work for your life, not just in theory.

Modern pet-friendly options blend advanced materials with some pretty sophisticated looks. Performance fabrics and luxury vinyl flooring, for example, prove you can have both function and style in the same space.

Psychological Benefits for Pets and People

Spaces designed with pet needs in mind reduce anxiety for both animals and their owners. Pets feel more secure when they have designated areas and appropriate surfaces for natural behaviors.

When your home handles pet-related challenges easily, you experience less daily stress. You don’t worry about every scratch or accident because your materials can handle them.

Benefits you’ll notice:

  • Reduced pet anxiety and destructive behavior
  • Less owner stress about home damage
  • More time enjoying your pet instead of constant cleaning
  • Better behavior from pets who feel their needs are met

If your pets have scratching posts, comfy resting spots, and safe play areas, you’ll probably see fewer behavioral issues. Investing in good design pays off for everyone at home.

Pet-Safe Materials and Non-Toxic Solutions

Pet-safe materials don’t include toxic stuff that can hurt animals if they chew or touch them. You’d be surprised how many household items contain chemicals that are risky for pets, even in tiny amounts.

Safe material choices:

  • Fabrics: Organic cotton, microfiber, natural wool, and performance fabrics without flame retardants
  • Flooring: Luxury vinyl plank, sealed concrete, porcelain tile, bamboo (which has natural antimicrobial properties)
  • Furniture finishes: Water-based sealants and stains instead of oil-based products
  • Cleaning products: Enzyme-based cleaners without harsh chemicals

Steer clear of furniture treated with stain-resistant chemicals containing perfluorinated compounds. Pets spend a lot of time on these surfaces, and those chemicals aren’t great for them. Look for Greenguard or similar certifications that mean low chemical emissions.

Plants are another thing to watch. Spider plants, Boston ferns, and parlor palms are safe, but lilies, philodendrons, or rubber plants? Nope, don’t bring those home if you have pets.

Always check product labels and certifications before you buy. If you aren’t sure, it’s worth calling the manufacturer to double-check.

Smart Fabric Choices for Style and Durability

Choosing the right fabrics protects your furniture from pet damage and keeps your place looking good. The best pet-friendly fabrics resist stains, scratches, and moisture, and they can handle frequent cleaning.

Performance Fabrics and Washable Options

Performance fabrics are built to handle whatever your pets throw at them. They use tight weaves and special treatments that resist stains, moisture, and odors.

Brands like Crypton and Sunbrella make fabrics that look nice but clean up easily with just soap and water. That’s pretty handy when accidents happen.

Washable slipcovers give you flexibility. Just pull them off and toss them in the wash when you need to.

Look for slipcovers made from tightly woven canvas or denim. These hold their shape after washing and don’t get all saggy over time.

Cotton blends are a solid choice since they’re durable and easy to care for. Aim for a thread count between 200 and 400 for the right mix of strength and comfort.

Microfiber is another favorite. Its ultra-fine fibers create a tight surface that repels liquids and resists pet hair.

Skip delicate materials like silk, velvet, or loose-weave linens. They snag easily and show every little mark. Stick with washable fabrics that can handle regular cleaning without fading or shrinking.

Stain-Resistant and Scratch-Resistant Surfaces

Stain-resistant fabrics use protective coatings or synthetic fibers to keep spills from soaking in. Look for fabrics treated with Scotchgard or similar stuff.

Outdoor fabrics work indoors too, since they’re built to resist water, sun damage, and mildew. Synthetics like polyester and nylon naturally resist stains better than natural fibers, and they dry faster after cleaning.

For upholstery, stick to tightly woven fabrics with a thread count above 200. Leather and faux leather also resist scratches better than most fabrics, and distressed or textured leather hides minor scratches well.

Just avoid bonded leather, because it peels and cracks with pet claws. Canvas and denim are surprisingly scratch-resistant because of their dense weave.

These easy-to-clean materials can be spot-cleaned or machine-washed, depending on your furniture. They also come in modern colors and patterns, so you don’t have to settle for boring.

Selecting Pet-Friendly Rug Materials

Flat-weave rugs are your best bet with pets. They don’t have loops for claws to snag, and they trap less pet hair and dander than shag or high-pile rugs.

Materials like jute, sisal, and seagrass are durable natural options. Washable rugs are a lifesaver too. Lots of brands now make machine-washable rugs in stylish patterns, even up to 8×10 feet.

Indoor-outdoor rugs made from polypropylene resist stains and moisture, and you can just hose them down outside if needed.

Wool rugs naturally resist stains and odors, but they need professional cleaning. If you go for wool, pick darker colors or patterns to hide dirt between cleanings.

Light colors show every paw print, so they’re not the most practical choice with pets.

MaterialBest ForCleaning Method
PolypropyleneHigh traffic, accidentsHose or machine wash
Jute/SisalScratch-resistantVacuum, spot clean
CottonEasy careMachine washable
WoolOdor resistanceProfessional cleaning

Furniture Solutions for Pet-Friendly Living

Smart furniture choices mix durability with style and meet your needs and your pet’s comfort. The right pieces resist damage, hide pet essentials, and create better traffic patterns for everyone at home.

Choosing Pet-Friendly Furniture Styles

Pick furniture with tightly woven fabrics and solid construction. Microfiber stands out since its tight weave resists stains and pet claws, and it doesn’t show damage easily.

The smooth surface keeps pet hair from getting stuck deep in the fabric. Leather is another solid option, cleaning up easily with a damp cloth and developing a natural patina over time that hides small scratches.

Performance fabrics are a good bet too, since they’re made for high-traffic spots where spills and messes are common.

Steer clear of these materials in a pet-friendly home:

  • Velvet (traps pet hair)
  • Silk and delicate fabrics
  • Wicker or rattan (pets chew through them)
  • Light-colored woods that show every mark

For wood furniture, go for hardwoods like oak or maple. These resist scratches better than softwoods because of their dense grain.

Darker stains hide scratches more than light finishes. If you like the distressed look, that’s even better, since extra marks from pets just blend in.

Multi-Functional and Hidden Pet Furniture

Built-in solutions help you keep pet essentials organized while keeping your home stylish. Under-stair spaces make great pet nooks if you add bedding and built-in bowls.

These areas give your pet a cozy retreat and keep supplies tucked away. Hidden litter boxes disguised as end tables or cabinets get rid of eyesores in your living room.

Look for pieces with ventilation holes and easy access for cleaning. Dog crates built into console tables do the same for dogs.

Window seats double as cat trees if you add climbing shelves and scratching surfaces. Use cushions that match your furniture for a cohesive look.

Elevated feeding stations built into kitchen islands make mealtime easier and keep bowls off the floor.

Consider these multi-functional options:

  • Console tables with hidden dog crate compartments
  • Ottoman-style hidden litter boxes with ventilation
  • Bench seating with built-in pet bed storage underneath

Durable Furniture That Blends In

Pet furniture doesn’t have to stick out like a sore thumb. These days, modern pet beds come in styles that actually match both contemporary and traditional spaces.

Pick dog beds with washable covers in colors that play nicely with your room’s palette. That way, your dog’s stuff won’t look out of place.

Cat trees aren’t just those old carpet towers anymore. Now you can find designs made from natural wood, sisal rope, and neutral fabrics.

Wall-mounted cat shelves give cats climbing fun without eating up your floor space. They’re a smart move if you don’t want a bulky tower in the middle of everything.

Product Suggestion: The Tuft & Paw Milo Cat Tree has a minimalist look with solid walnut and cream cushions, so it won’t mess with your modern vibe. For dogs, the Mahabis Pet Bed brings a Scandinavian touch with machine-washable covers in lots of neutral shades.

Instead of tossing the whole bed when covers get worn, just swap out the covers. Keep a couple of extras handy, so there’s always a clean one ready.

This way, you save money and your pet furniture always looks fresh.

Layout Strategies for Comfort and Flow

Place furniture so your pets have natural pathways. Leave open routes between rooms, so animals don’t have to jump over stuff or squeeze through tight spots.

Put sturdy pieces along the walls where pets like to rub. That keeps your layout practical and pet-friendly.

Keep fragile decor up high, away from wagging tails. Coffee tables with lower shelves work better than ones loaded with breakables at tail height.

Secure tall furniture, like bookcases, to the wall in case your pet decides to climb. No one wants a surprise crash.

Give your pets their own little zones in each main room. A cozy corner with a pet bed gives them a go-to place to relax.

Set these spots away from busy walkways but where your pets can still see what’s going on. They like to keep an eye on the action.

Don’t shove furniture right against the wall. Leave enough space so pets don’t get wedged behind things.

This also makes it easier to vacuum up pet hair. Arrange seating so pets can hang out near you without blocking the flow of the room.

Creating Dedicated Pet Zones in Your Home

Great pet zones mix function with your existing decor by using matching materials, clever storage, and smart placement. The right setup keeps pet stuff organized and your space looking tidy.

Integrated Feeding Stations and Pet Nooks

Integrated feeding stations cut down on floor mess and protect your surfaces from spills. Built-in options work best in kitchen islands or lower cabinets, where you can add pull-out drawers for food and elevated bowls for your pet’s comfort.

Stick to the same finishes as your cabinets, so the station looks like it belongs. No one wants a feeding area that screams “afterthought.”

Under the stairs is a sneaky spot for a pet nook. Toss in a cushion that matches your living room and add a water bowl on an easy-clean tile base.

Small cubbies for toys and treats keep everything in one place. It’s nice when pet clutter doesn’t take over.

In the mudroom, set up a pet station with hooks for leashes, a tile section for muddy paws, and a bench for quick wipe-downs. This keeps dirt from traveling through the whole house.

Designing Play and Rest Areas

Window seats give cats the high perches they crave and double as cool architectural features. Add cushions in tough microfiber or canvas that go with your color scheme.

Wrap the sides in sisal rope for scratching, so your furniture elsewhere stays safe. It’s a small thing, but it works.

Built-in dog crates that look like end tables or consoles offer safe spots for your dog to rest without messing up your decor. Pick wood finishes that match your other furniture and add a comfy pad inside.

The top works as regular furniture for lamps or decor. No one guesses there’s a crate underneath.

For cats, wall-mounted shelves in geometric patterns create vertical climbing fun. Stain or paint them to blend in, and suddenly you’ve got a pet zone that also feels like modern art.

Pet Gates and Space Dividers

Modern pet gates actually look good now, with wood and metal designs that feel like furniture. Pick clean lines and finishes that match your home hardware for a polished look.

Freestanding gates are handy if you only need barriers sometimes. They’re easy to move around as needed.

Built-in gates between rooms keep sightlines open while controlling where pets can go. Half-walls with spindles or sleek metal railings make for permanent boundaries that still look nice.

Try them between kitchens and dining rooms to keep pets out during meals. You don’t have to close off the space visually.

Decorative dividers with solid lower panels and open tops let air and light through but stop small pets from wandering. Look for wood or woven panels that add texture to your space.

Layout and Cleaning Considerations

Smart room layouts help prevent accidents and cut down on mess. The right surfaces and cleaners keep your home looking sharp without putting your pets at risk.

Optimizing Room Layout for Pets

Put pet beds away from busy areas so your pets get a little peace and quiet. Food and water stations work best on tile or waterproof mats for easy cleanup.

Give your pets clear walkways, so they don’t knock over decor or bump into furniture. It just makes life easier for everyone.

Keep litter boxes or pet stations in quiet corners with good airflow. Don’t stick them near heating vents or in cramped spaces.

If you’ve got cats, make sure they can reach windows or perches without having to leap onto fragile stuff. They’ll thank you for it.

Hide electrical cords or run them behind furniture. Use cord covers if you have to.

Store pet toys in bins or baskets near play areas. It keeps things organized and makes cleanup way faster.

Flooring Choices and Surface Protection

Luxury vinyl plank is honestly one of the best floors for pet owners. It shrugs off scratches, repels water, and cleans up with no fuss.

Tile and sealed concrete are also solid picks because accidents won’t ruin them. They’re tough and pretty forgiving.

If you have hardwood, lay down area rugs where your pets hang out most. Go for rugs with rubber backing to stop slipping.

Scratch-resistant surfaces like sealed hardwood or laminate with a protective coat last longer in a pet-filled home.

Put washable mats under food bowls to catch messes. Use protectors on couch and chair legs to stop scratching.

Try clear film on high-traffic spots or door frames where pets come and go. It’s a simple fix that helps a lot.

Cleaning and Maintenance Tips

Use pet-safe cleaners that skip harsh stuff like ammonia or bleach. Pets lick things, so it’s better safe than sorry.

Enzyme-based cleaners break down odors and stains naturally. They’re a lifesaver for pet messes.

Keep a little cleaning kit in each room with a lint roller, microfiber cloth, and stain remover. That way, you can jump on messes before they set.

Vacuum at least twice a week to keep hair and dander under control. It’s not fun, but it helps.

Wash pet bedding weekly in hot water. Wipe down pet-safe decor monthly to clear out dust and hair.

Clean bowls daily with hot soapy water. Steam clean carpets and upholstery every few months to get rid of deep-set odors and allergens.

Incorporating Pet-Friendly Style and Decor

You can actually make your home look better and keep pets safe. Choose non-toxic plants, stash pet gear in nice storage, and add some pet-themed accents that aren’t tacky.

Pet-Safe Houseplants and Botanical Touches

Spider plants are a top pick for pet owners since they’re totally non-toxic for cats and dogs. Plus, they’re tough and look great in hanging baskets or planters.

Boston ferns add a lush vibe and are safe if your pet takes a nibble. No worries there.

Other good choices include:

  • Parlor palms for a tropical touch in low light
  • Ponytail palms if you want something sculptural
  • Prayer plants with cool leaf patterns

Skip toxic plants like lilies, philodendrons, and pothos. Always check the ASPCA’s plant database before buying new greenery.

Put safe plants where your pets explore, so you don’t have to stress about accidental snacking.

Chic Storage for Pet Essentials

Built-in storage keeps leashes, toys, and grooming stuff out of sight. Add pull-out drawers in benches or entryway tables for daily essentials.

Woven baskets in neutral colors blend in while keeping toys from taking over. It’s a simple fix that actually works.

Designated storage solutions:

  • Wall hooks at the right height for leashes and harnesses
  • Ottoman storage boxes that double as extra seating
  • Kitchen cabinets with pull-out food bins

Repurpose furniture by adding fabric bins inside consoles or buffets. Pick storage pieces that match your room’s style, so it all feels intentional.

Accent Pieces and Pet-Themed Artwork

Pet-themed art doesn’t have to be cheesy. Black and white pet photos in gallery frames look surprisingly classy.

Abstract animal silhouettes work well in modern spaces. You can get creative without going overboard.

You might want to display:

  • Framed vintage dog or cat breed prints
  • Sculptural animal bookends
  • Throw pillows with subtle paw prints

Keep fragile decor on higher shelves, away from tails. Pick sturdy accent pieces made from metal or stone instead of breakable ceramics.

Let your pet-inspired decor fit with your color scheme and style. It should feel like part of the room, not the main event.

Product Recommendations for a Pet-Friendly Home

The right products make pet-friendly decorating way easier. These three handle daily pet chaos and still look good in your home.

Recommended Washable Rug: Ruggable Chenille Rug

Ruggable rugs really solve the classic pet owner problem. The two-piece system has a non-slip pad and a machine-washable top layer you can just toss in the wash.

No need to panic over accidents, muddy paws, or pet hair. The chenille version feels soft underfoot and hides pet hair better than flat-weave rugs.

There are tons of patterns and colors to pick from. You can match any space, really.

These rugs work on any hard floor. When something spills, just pull up the top layer and wash it. The pad stays put, so you don’t have to move all your furniture.

Prices change by size, but being able to wash the rug saves money over time. No more professional cleanings or early replacements.

Stylish Pet Bed Option: Casper Dog Bed

The Casper Dog Bed uses the same comfort tech as their mattresses, so your pet gets real support. The memory foam base helps aging pets and stands up to daily use.

The removable cover goes right in the wash. The design looks like actual furniture, with clean lines and neutral colors that fit into living rooms or bedrooms.

You get three color options, so you can match your style. The bed comes in several sizes for different breeds.

Most of the fur stays on the bed, not your couch. The cover resists moisture and doesn’t trap odors the way some fabrics do.

Multi-Functional Furniture: Fable Pets Signature Crate

The Fable Pets Signature Crate doubles as a dog crate and a side table. The powder-coated steel frame comes in trendy colors like sage green and terracotta.

The top holds lamps, books, or plants, just like any side table. This saves space, especially in smaller homes.

You don’t need separate spots for pet crates and furniture. The open wire design lets air move and gives your dog a good view.

The crate comes with a removable cushioned mat for washing. Assembly is quick and doesn’t need any tools.

It’s sturdy enough for dogs up to 70 pounds, depending on the size you choose. Some models even have hidden storage underneath for leashes and toys.

The furniture look means you can put it in the main living area without it standing out as a crate.

Frequently Asked Questions

Pet-friendly decor means picking fabrics like microfiber or leather, furniture with tight weaves and solid build, layouts that give pets clear paths, and keeping up with regular cleaning using enzyme sprays and lint rollers.

What are the best durable fabrics to use for pet-friendly home decor?

Microfiber is a top pick for pet-friendly fabrics. Its tightly woven synthetic fibers resist stains and scratches, and pet hair doesn’t get stuck in it as easily.

Leather is another strong option. You can wipe it clean quickly, and it develops a patina over time that hides small claw marks.

Performance fabrics like Crypton come with liquid-proof barriers and antimicrobial properties. They fight stains and help prevent odors after pet accidents.

Canvas and duck cloth work well for removable covers. You can toss them in the washing machine when needed.

Steer clear of velvet, silk, and delicate fabrics if you have pets. Velvet loves to trap hair and shows every little mark, while silk tears and stains for good.


How can one choose furniture that is both stylish and suitable for pets?

Choose furniture with tightly woven upholstery and solid wood construction. The tight weave keeps claws from snagging threads and tearing fabric.

Go for hardwoods like oak or maple for frames and legs. These dense woods handle scratches better than pine, and a distressed finish hides minor damage.

Pick simple furniture with minimal decorative elements. Pieces without ornate details or delicate carvings stand up better to pets.

Skip wicker, rattan, or anything your pet might want to chew. Those materials rarely survive long in a pet home.

Think about furniture height for your pet’s needs. A low-profile sofa helps older pets climb up, while taller pieces keep surfaces out of reach from jumpers.


What are effective layout strategies for a home with pets to enhance both style and functionality?

Make clear pathways so pets can move around easily. Place sturdy furniture along walls where pets like to rub, and keep fragile pieces in quieter spots.

Set up pet beds and feeding stations in the same spots. Pets feel more comfortable with routine, and it keeps essentials from wandering everywhere.

Put breakable decor on higher shelves, away from wagging tails. Floating shelves or tall bookcases keep fragile items safe and out of reach.

Try blending pet zones with your overall style. Maybe build a crate into a console table, or turn an under-stair nook into a spot for food bowls.

Leave some space between furniture pieces for cleaning. You’ll want to reach under sofas and behind chairs to vacuum up pet hair.


What are some cleaning tips for maintaining a pet-friendly and stylish home?

Use enzyme cleaners for pet accidents. These break down odor-causing compounds, not just cover up smells.

Keep a lint roller in every room for quick hair pickup. Roll upholstery, lampshades, and curtains weekly to keep hair under control.

Vacuum at least twice a week with a pet-specific vacuum. Models with rubber brushes pull up fur better than regular bristles.

Wash pet bedding weekly in hot water. Toss in some white vinegar during the rinse to fight odors without harsh chemicals.

Put washable mats under food and water bowls. They catch spills and look nice, plus they protect your floors.

Wipe down leather furniture monthly with a damp cloth. Use leather conditioner after to keep it supple and prevent cracks.


Can you recommend any pet-resistant home decor products that also add to the aesthetic of the space?

Luxury vinyl plank flooring looks like hardwood but is totally waterproof. It resists scratches and doesn’t warp from pet accidents.

Outdoor rugs work great indoors for pet areas. They’re stain-resistant, easy to clean with a hose, and come in tons of stylish designs.

Slipcover sofas let you wash covers when needed. IKEA and Pottery Barn have machine-washable slipcovers in loads of colors and styles.

Performance fabric throw pillows add color and can take a beating from pets. Look for stain-resistant or washable covers to match your decor.

Custom built-in pet gates that match your trim or cabinets can keep pets where you want them. Wood gates look a lot better than the usual metal ones.


What are some design tips for creating a calming and relaxing living room that accommodates pets?

Go for a neutral color palette in medium tones that help hide pet hair. Beiges, grays, and warm taupes feel serene and do a good job camouflaging fur between cleanings.

Bring in soft textures with pet-friendly materials. Microfiber throw blankets and washable cotton pillows feel cozy but don’t trap hair or stains as much.

Pick a pet bed that actually fits your color scheme. Elevated beds with wood frames or geometric shapes can look intentional, not just tossed in the corner.

Try dimmable lighting to set a relaxing vibe. Pets notice calmer environments too, and adjustable lights let you tweak the mood for everyone.

Consider pet-safe plants like spider plants or Boston ferns. They add a bit of nature and won’t cause trouble if your pet decides to take a bite.

Keep clutter down by storing toys in decorative baskets. Woven baskets or fabric bins in matching colors keep things peaceful and you won’t have to hunt for essentials.


Choosing Wall Art for Different Rooms: Complete Sizing, Color, and Styling Guide

0

Choosing wall art can feel a bit overwhelming when you’re staring at blank walls and endless online catalogs. The right piece does more than just fill empty space, it sets the mood, pulls your room together, and reflects your personal style.

The key to choosing wall art is matching the size to your furniture (aim for two-thirds to three-quarters the width), hanging pieces at eye level (57-60 inches from the floor), and selecting colors that either harmonize with or complement your existing decor.

Most people make the same mistakes: hanging art too high, picking pieces that are too small, or choosing colors that clash with the room. You don’t need a design degree to get this right.

Simple formulas for sizing, clear rules for placement, and a few smart color-matching strategies will help you make decisions you won’t regret.

This guide walks you through how to select, size, and hang wall art in your living room, bedroom, kitchen, office, and more. You’ll find practical tips that work in real homes, plus a few standout pieces that fit popular styles and budgets.

Key Takeaways

  • Size your wall art to two-thirds or three-quarters the width of the furniture beneath it and hang the center at 57-60 inches from the floor
  • Match art colors to your existing textiles or use complementary colors from a color wheel for a cohesive look
  • Choose themes based on room function, like calming art for bedrooms, energizing pieces for kitchens, and professional styles for offices

Fundamentals of Choosing Wall Art

Start with understanding your space’s purpose, recognizing your tastes, and taking accurate measurements. These three basics guide your decisions and help you dodge the usual mistakes, like buying art that’s too small or doesn’t match your room’s vibe.

Understanding Room Function and Mood

Each room in your home serves a different purpose, so your wall art should support that function. Living rooms benefit from conversation-starting pieces that show your personality and welcome guests.

Bedrooms need calming artwork that helps you relax, like soft landscapes or abstract pieces in muted tones. Think about the emotions you want to create.

Warm colors like reds and oranges make spaces feel cozy and energetic. Cool blues and greens create a peaceful atmosphere.

Your kitchen might work well with food photography or bright, cheerful prints. Home offices need focused, inspiring pieces that won’t distract you.

The mood you’re building should align with how you use each space. A dining room can handle bold, dramatic art that sparks conversation. A nursery calls for gentle, soothing images that help kids feel safe.

Identifying Your Personal Style

Your wall decor should reflect who you are, not just what’s trendy. Look at your existing home decor and see what colors, materials, and shapes you gravitate toward.

Do you like clean lines and minimal designs, or prefer something layered and eclectic?

Consider these common style categories:

  • Modern: Clean lines, abstract pieces, bold colors
  • Traditional: Classic paintings, landscapes, ornate frames
  • Rustic: Nature scenes, weathered textures, earth tones
  • Minimalist: Simple designs, monochrome palettes, sparse arrangements

Don’t feel boxed into one style. It’s pretty common to blend elements from different looks and end up with something that feels like you.

Assessing Wall Space and Measuring Your Walls

Before you shop, grab a tape measure and jot down the width and height of the space you want to fill. It only takes a minute and makes things easier later.

Artwork should cover about 60-75% of the available wall space. For art above a sofa, aim for roughly two-thirds the width of the furniture.

A big piece on a small wall feels cramped. A tiny print on a huge wall just disappears.

Pay attention to the space around your art too. Leave 2-4 inches between pieces in a grouping.

Hang art with its center at eye level, usually 57-60 inches from the floor. These little tricks help your home feel balanced and intentional.

Types of Wall Art and Materials

Wall art comes in lots of formats, each with its own vibe, texture, and durability. Knowing the core types, from paintings to textiles, helps you pick the right medium for your room’s lighting, humidity, and style.

Paintings and Original Art

Original paintings bring a unique energy to your walls. You’re getting real brushstrokes and texture, straight from the artist’s hand, on canvas, wood, or paper.

Oil and acrylic paintings make great focal points in living rooms and dining spaces. Watercolors work well in bedrooms and studies because their softer palette feels calming.

Gouache and mixed-media pieces add layered interest in creative spaces like home offices or studios.

Framing matters. Unframed canvases feel casual and modern. A floating frame adds a shadow gap that lifts the piece and gives it a gallery vibe.

For works on paper, use UV-protective glass to prevent fading if your room gets a lot of sun.

Original art costs more, but it holds value and tells a story that prints just can’t. If you’re on a budget, check out emerging artists at local galleries or online.

Art Prints and Photographs

Prints and photographs let you get high-quality imagery for less. They’re versatile, easy to swap out, and come in just about every style.

Canvas prints arrive ready to hang and don’t need a frame. They’re great if you have a bright space and want to avoid glare.

Framed art adds polish and protection. Go for acrylic glazing if you’re worried about weight or have kids running around.

Metal prints bond the image right to aluminum, which gives bold contrast and a modern edge. They’re tough enough for kitchens and bathrooms.

Photographs, especially black-and-white or architectural shots, look sharp in offices, hallways, and minimalist spaces. For bedrooms, try soft landscapes or botanical close-ups.

In dining areas, food photography or travel prints can get people talking.

Print quality matters. Look for archival inks and acid-free paper so your art doesn’t yellow over time. Giclée prints use fine-art inkjet tech and can rival original paintings for detail.

Textile and Fabric Art

Tapestries, woven hangings, and fabric art soften hard surfaces and help absorb sound. They’re ideal for rooms with lots of tile, concrete, or glass.

Tapestries can range from traditional woven scenes to modern macramé. Hang them above beds, sofas, or in entryways for warmth without the weight of a frame.

Fabric prints on linen or cotton work in casual spots like playrooms, laundry rooms, or covered patios.

Textiles handle humidity better than paper, but they still need some ventilation. Don’t hang them in steamy bathrooms unless you have a good exhaust fan.

Dust them now and then with a soft brush or vacuum attachment to keep them fresh.

If you love boho, coastal, or Scandinavian looks, textile art adds the organic texture you need to balance all those clean lines and neutrals.

Sculptural and Mixed Media Pieces

Sculptural wall art and mixed media combine materials like metal, wood, resin, and found objects. They bring shadow, dimension, and a sense of movement that flat art just can’t match.

Metal wall sculptures fit well in modern and industrial spaces, like geometric shapes or abstract forms. Wood assemblages bring warmth to rustic, farmhouse, or mid-century rooms.

Resin pieces add color and gloss. They’re striking in contemporary kitchens and offices.

Placement tip: Give sculptural art some breathing room. Hang it on a large wall by itself or with simple, low-profile furniture so it stays the star.

Avoid crowding it with gallery walls or busy patterns.

Mixed media pieces, like collages or layered panels, suit creative spaces and eclectic interiors. They invite people to take a closer look and feel more collected than coordinated.

Wall Art Sizing and Placement Essentials

Getting the right art sizing and placement can make the difference between a room that feels complete and one that looks unfinished. You just need to understand some basic proportions, hanging heights, and how to arrange multiple pieces.

Art Sizing Formulas and Size Calculators

The two-thirds ratio is the big rule here. When you hang art above furniture, your piece should be 60-75% of the furniture’s width.

For a 90-inch sofa, look for art that’s at least 60 inches wide. For a 60-inch console table, aim for 40-45 inches.

You can use a wall art size calculator or just do the math. Multiply your furniture width by 0.67 for the minimum width.

A king bed at 76 inches wide? Go for art around 50 inches wide.

Quick sizing reference:

  • Above 90-inch sofa: 60-68 inches wide
  • Above 60-inch console: 40-45 inches wide
  • Above king bed: 50-57 inches wide
  • Above queen bed: 30-45 inches wide

If you want a single statement piece, go bigger. A large canvas makes a bold impact and honestly, it’s easier than planning a bunch of smaller pieces.

For smaller art, create a gallery wall where the total arrangement matches those proportions.

Ideal Placement: Height, Breathing Room, and Groupings

Hang your art so the center sits at 57-60 inches from the floor. That’s about eye level for most people and just feels right.

When you place art above furniture, leave 6-10 inches of space between the top of the furniture and the bottom of your art. This connects the pieces without squishing them together.

For beds, use 6-12 inches above the headboard. For sofas, stick to 8-10 inches.

To find your hanging height:

  1. Mark 57 inches up from the floor
  2. Measure your artwork height and divide by 2
  3. Measure from the center to the hanging hardware on the back
  4. Add that measurement to 57 inches for your nail placement

In dining rooms where you’re mostly sitting, drop the center to 52-54 inches so the art lines up with your seated eye level.

Gallery Walls: Layout, Spacing, and Design

A gallery wall takes planning but gives you lots of freedom to mix frame sizes. The total arrangement should still follow the two-thirds rule for the wall or furniture below.

Space individual pieces 2-4 inches apart for a tight, cohesive look. Use 4-6 inches if you want more breathing room between frames.

Mix two or three larger pieces (24×36 inches or bigger) with four to six smaller ones (8×10 to 11×14 inches).

Common gallery wall layouts:

  • Grid layout: Same-size frames in neat rows with even 2-inch spacing
  • Salon style: Mixed sizes arranged around one big anchor piece
  • Horizontal line: Different sizes but all centers lined up at 57 inches
  • Vertical stack: Pieces stacked in a column for narrow walls

Before you grab the hammer, cut paper templates of your frames and tape them to the wall. Live with the arrangement for a day and tweak it if something feels off.

This saves you from making a bunch of unnecessary holes and helps you see how it’ll actually look.

Color Coordination and Theme Matching

The colors and themes in your wall art should work with your room’s palette to create a balanced, unified space. Matching hues and picking the right artistic themes helps you get the mood you want.

Matching Art to Room Colors

Start by noticing the primary colors already in your room. Look at your walls, furniture, curtains, and decor to see which shades pop out.

Try a color wheel to spot colors that naturally complement your room. If your space is mostly neutral—think beige, gray, or white—you’ve got freedom to play with almost any color family.

Bolder wall colors? Go for art that matches the dominant shade or picks up on accent colors in your pillows, rugs, or smaller pieces.

Consider these practical approaches:

  • For darker rooms, art with lighter or brighter colors can really lift the mood
  • In bright spaces, deeper tones in your artwork add sophistication and depth
  • Monochromatic rooms come alive with art in varied shades of the same color, keeping harmony intact

Check the undertones in both your paint and potential artwork. Warm beige walls pair better with art featuring warm undertones, while cool gray walls vibe with cooler color schemes.

Using Complementary and Accent Colors

Complementary colors sit opposite each other on the color wheel and bring dynamic energy when paired. If you’ve got blue walls, try artwork with orange or rust tones. Purple walls? Yellow accents in your art can work wonders.

Accent colors show up in small doses around your room and give you another way to coordinate. Got teal pillows or a burnt orange chair? Hunt for art with those shades. It ties things together without needing an exact match.

Effective color strategies include:

  • Use art to introduce a new accent color you want to spread through the room
  • Pick pieces with multiple colors that bridge different parts of your decor
  • Balance warm and cool tones so your space doesn’t feel flat

Bold abstracts often help when you want to bring in a bunch of accent colors at once. These pieces usually feature several hues that can connect the dots in your room’s color scheme.

Choosing Themes for Atmosphere and Cohesion

The theme of your wall art shapes the emotional vibe of your space. Serene landscapes and botanical prints create a calm, relaxing mood—perfect for bedrooms or reading nooks.

Nature-based themes feel especially right where you want rest and tranquility. If you want more energy, bold abstracts can wake up living rooms or creative corners. Abstracts are more flexible for color, too, since they’re not tied to real-world subjects.

Match themes to room function:

  • Bedrooms: serene landscapes, soft botanicals, or gentle abstracts
  • Living rooms: dynamic themes like cityscapes, bold abstracts, or dramatic photography
  • Dining areas: food art, wine country scenes, or vibrant still lifes

Stick to a consistent theme within each room or connected space. Too many different themes can make things feel busy and a bit chaotic.

Styling Tips and Finishing Touches

The right frame, decent lighting, and a little layering can turn good wall art into something that really finishes your space. These details protect your art and help your room feel complete.

Frame Selection and Hanging Hardware

Pick a frame that fits both the art’s style and your room’s vibe. Modern art pairs well with sleek metal or simple wood frames, while traditional pieces look better in ornate or classic wood frames.

Float frames give a contemporary feel by suspending art between two pieces of glass. This works great for canvas prints and abstracts, adding depth and a touch of luxury.

Consider these frame guidelines:

  • Match frame width to art size—bigger art needs thicker frames
  • White or black frames are versatile and move easily between rooms
  • Natural wood frames warm up bedrooms and living areas
  • Metal frames are smart for bathrooms and kitchens because they handle moisture

Choose hanging hardware based on your wall and art weight. Picture hooks work for lighter pieces up to 20 pounds. Heavier art needs wall anchors or studs. D-rings and wire suit most framed art, while sawtooth hangers fit smaller works.

Mixing Mediums for Depth and Texture

Mixing different art types adds interest without making your walls feel crowded. Pair framed art with metal sculptures or woven pieces to add dimension. This approach stands out in living rooms and entryways.

Layer art on shelves or mantels with plants or books for a casual, personal look. Start with the biggest piece in back and move forward with smaller items.

Effective mixing strategies:

  • Combine photography with line drawings for contrast
  • Mix canvas prints with framed art for texture
  • Add a mirror to bounce light and open up smaller rooms
  • Balance busy patterns with solid colors or minimalist pieces

Keep a common thread across mixed pieces—maybe a color, frame style, or theme—to tie everything together.

Lighting and Longevity of Wall Art

Direct sunlight fades art fast. Hang pieces away from windows or use UV-protective glass for framed art in bright spots. Gallery walls in hallways usually last longer since they get less sun.

Picture lights above framed art give a museum vibe and highlight favorite pieces. LED strips are good for gallery walls and won’t add heat that could hurt your art.

Clean framed art every few months with a dry microfiber cloth. Wipe dust from the frame and glass, but skip cleaning products that could sneak behind the glass. For canvas or unframed art, use a soft brush to gently dust.

Bathrooms and kitchens are tough on art because of humidity. Use sealed frames with backing boards to protect prints. Metal and acrylic art handle these spaces way better than paper or canvas.

Room-by-Room Wall Art Recommendations

Every room in your home has its own purpose and needs art that fits. The right wall art ties your decor together and sets the mood, whether you want energy or calm.

Living Room: Impactful Focal Points

Your living room needs a strong anchor piece that grabs attention without overpowering everything else. Look for art that’s about two-thirds to three-quarters the width of your sofa or console.

Large abstracts work well—they’re interesting but don’t compete with conversation. Cityscapes and landscape horizons create movement across your seating area. Got a long sectional? Try two big pieces instead of one centered print.

Scale matters more here than anywhere else. Too-small art looks lost above your furniture. Painter’s tape helps you visualize before you hang anything.

For modern living rooms, black and white photography adds sophistication without clashing with color. Gallery walls look great here, too, if you keep 3-6 inches between frames and choose one piece to anchor the group.

Bedroom: Calm and Personal Spaces

The bedroom should have softer imagery that helps you relax. Botanicals, serene wildlife, and minimal abstracts keep things peaceful.

Matte finishes beat glass if your art faces morning windows—glare ruins the calm. A diptych above the headboard feels orderly but not too stiff.

Pick art that’s 60-80% of your mattress width. Low headboard? Go taller. High headboard? Go wider to balance things out.

Gentle earth tones and muted palettes work best here. Pull colors from your bedding or rug for cohesion. Wildlife prints in warm neutrals add personality without disturbing the restful mood. Steer clear of high-contrast or energetic pieces that keep your mind buzzing at bedtime.

Kitchen and Dining: Playful and Inviting Choices

Kitchens can handle playful prints that might feel out of place elsewhere. Food art, vintage typography, and bright still lifes match the energy of cooking and gathering.

Open shelving? Lean a framed print behind canisters or your coffee setup. It’s a quick way to add interest without needing extra wall space.

Keep art away from direct steam and splatter. Go for sealed canvas or framed prints with protective backing. Botanical and coffee-themed art just feels right in these spaces.

Dining areas do well with art that sparks conversation. A small gallery wall of food prints or market scenes keeps things light and social. Frame sizes can be smaller here since folks are usually seated.

Entryway and Office: Welcoming and Inspiring Art

Your entryway sets the tone for your whole home. Choose one confident piece over lots of tiny frames. Vertical art works especially well in narrow spaces, drawing the eye up and making things feel taller.

Office art should reduce visual fatigue and look professional. Black and white photography, calm abstracts, and structured landscapes fit both home offices and clinics.

Monochrome pieces feel timeless and won’t distract during focused work. Nature studies and architectural prints give subtle interest without demanding attention. Light oak frames warm up stark office walls, while black frames keep things sharp and modern.

In waiting areas or client offices, aim for gentle interest rather than bold statements. Art should feel welcoming but not provoke strong reactions that could throw off a visitor.

Top Wall Art Product Recommendations

Quality materials, thoughtful design, and proper sizing make all the difference. The right canvas, frame, or textile brings color, texture, and a bit of personality into your home.

Recommended Large Canvas and Statement Pieces

Large canvas prints work best above sofas, beds, and in living rooms where you need a strong focal point. Look for pieces between 40 and 60 inches wide that match about two-thirds to three-quarters of your furniture’s width.

Abstract & Geometric canvases fit modern and contemporary spaces. Pick designs with two or three colors pulled from your existing textiles for visual harmony. These pieces usually arrive ready to hang with sturdy stretcher bars and hardware.

Cityscape and landscape statement pieces add depth to blank walls. Horizontal panoramas stretch tight spaces, while vertical formats lift the eye in rooms with standard 8-foot ceilings.

Canvas gives a matte finish that cuts glare in bright rooms. The texture adds warmth you just don’t get from framed prints behind glass. Look for archival-quality inks rated for 75 years or more of fade resistance.

Top Picks for Prints and Floating Frames

Floating frames create a modern shadowline effect that adds depth to prints. The art seems suspended between the mat and frame face, making even simple prints feel special.

Pick black frames for high-contrast modern spaces with white walls and metal accents. Light oak frames warm up Scandinavian and coastal rooms without clashing with neutrals. White frames fit cottage and transitional styles.

Acrylic glazing weighs half as much as glass and resists shattering, so it’s great for high-traffic areas, kids’ rooms, and stairwells. Museum-grade acrylic blocks 99% of UV rays, protecting delicate papers and watercolors from fading.

Standard print sizes (16×20, 18×24, 24×36 inches) fit ready-made frames at any price. Prints let you swap out seasonal themes without a big redesign. Keep extras handy and rotate them every few months for easy updates.

Best Options for Textile and Fabric Wall Art

Tapestries and fabric wall hangings really help soften up hard surfaces in bedrooms, dorms, and lofts. They add acoustic dampening that canvas and prints just can’t offer, especially in echo-prone spots with hardwood floors.

Woven tapestries with boho, botanical, or geometric patterns fit relaxed interiors. Hang them with a dowel rod and leather strap if you want that layered, collected vibe.

Sizes range from 50×60 inches up to 80×90 inches, so you can cover a big wall without dealing with the weight of framed art. It’s a lot less hassle than you might expect.

Macramé wall hangings and fiber art bring in organic texture. Pair them with minimal furniture to let the textile stand out as the room’s main attraction.

Stick with neutral tones like cream, taupe, or gray, since those layer over pretty much any wall color. It’s hard to go wrong with those shades.

Fabric art usually ships flat and you can install it in minutes using small nails or adhesive hooks. Most textiles handle spot cleaning with mild detergent, so they’re practical for rentals or high-traffic areas where glass just isn’t ideal.

Frequently Asked Questions

Wall art sizing follows some tried-and-true formulas, but color matching really depends on your existing textiles and a basic sense of what colors work together. Placement height usually centers around eye level, and coastal pieces look best when they echo natural textures.

What are the best practices for choosing the size of wall art for a living room versus a bedroom?

For your living room, art should measure about two-thirds to three-quarters the width of your sofa. This keeps things balanced without making the furniture feel dwarfed.

Leave 6 to 10 inches of space between the top of your sofa and the bottom edge of the art. It makes a difference, trust me.

In bedrooms, the same idea applies, but adjust for your mattress width instead. Aim for art that’s 60 to 80 percent of your mattress width if you’re hanging it above the bed.

If you’ve got a tall headboard, go wider instead of taller to keep the proportions feeling right. It just looks better that way.

Try to hang the center of your art at 57 to 60 inches from the floor in both rooms. That puts the focal point at about average eye level.

You might want to go a bit lower in bedrooms where you spend more time sitting or lying down.


Can you provide styling tips for incorporating wall art into a specific room theme?

Match your art’s mood to the room’s purpose. Pick restful botanical prints or calm wildlife for bedrooms where you want a little peace.

In living rooms or offices, go for energizing abstracts or cityscapes if you’re after more conversation and movement.

Pull colors straight from your existing textiles like rugs, pillows, or curtains. It instantly ties your art to the space.

If you want to get fancy, use a color wheel to find complementary colors that add some contrast without making things chaotic.

Stick to one visual story per room. A coastal theme fits with nautical motifs, driftwood, and ocean blues, while an urban theme feels right with cityscapes, architectural photos, and monochrome prints.

Mixing too many themes in one space just ends up feeling scattered.


What are the essential rules to follow when hanging wall art to ensure proper placement and visual appeal?

Hang art so its center sits about 57 to 60 inches from the floor in standard rooms. That way, it’s at eye level for most people.

For children’s rooms or spots where folks sit a lot, you can go a bit lower. It just feels more natural that way.

Leave 6 to 10 inches between the top of your furniture and the bottom of your art. This little gap keeps things from looking cramped.

In gallery walls, keep 3 to 6 inches of consistent spacing between frames. It makes everything look intentional.

Use two hooks for pieces wider than 24 inches to keep them level. Painter’s tape is great for outlining your art’s dimensions before you start hammering nails.

Start from the center of your gallery wall and work outward. It’s easier to get a balanced look that way.


How does one match wall art colors with the room’s existing color scheme effectively?

Begin with your room’s main neutrals like floors, sofas, or bedding. Pick art that either blends within two shade steps of these colors or stands out with high-contrast complementary colors.

Beige, warm gray, and sage usually play well together and feel pretty serene.

Use a color wheel to spot complementary pairs like blue and orange or green and red. These opposites add energy without turning the room into chaos if you balance them right.

Adobe Color has a free palette generator if you want to see complementary and split-complementary options.

Echo one accent color in two or three places around your room. If your art has coral, repeat that color in a pillow or a small vase for a pulled-together look.


What are some unique wall art placement ideas for decorating two adjacent walls in a living space?

Try repeating a color or theme across both walls to create a sense of flow. It connects the spaces without making them matchy-matchy.

You can switch up sizes or orientations but stick to the same color family or subject for cohesion.

A corner gallery works too, where frames wrap around the corner at different heights. This is especially good with smaller prints that step up or down as they turn the corner.

Keep spacing consistent at 3 to 6 inches between frames for a tidy look.

Place a big statement piece on one wall and balance it with smaller, complementary pieces on the adjacent wall. This asymmetrical approach draws the eye without making the walls compete.

The smaller pieces should share at least one color with the larger anchor piece to tie it all together.


Could you recommend a couple of coastal wall art pieces ideal for a nautical-themed room?

An anchor canvas print in muted blues and weathered whites gives you that classic nautical vibe. It really stands out above beds or in a bathroom, and honestly, it just feels calming.

Try to find versions with minimal text and softer colors, not those bright, loud ones. Sometimes the subtle palettes just work better for that relaxed, beachy look.

A coastal landscape with driftwood, sea foam, or even a misty horizon adds a bit of natural texture. I like pieces that are horizontal, since they mirror the ocean’s horizon line.

Canvas prints usually hide reflections better than framed glass, especially in bright rooms with big windows. That little detail can make a big difference if your space gets a lot of sun.


Affordable Home Decor Upgrades That Dramatically Improve a Room

0

You don’t have to drop thousands just to make your home feel fresh and inviting. Simple upgrades like new light fixtures, throw pillows, wall art, or swapping out hardware can honestly change how a room looks and feels—without blowing your budget.

These little tweaks matter because they’re the things you see and touch every single day.

Most affordable home decor upgrades take less than a day. You can chip away at them one by one as your budget allows.

Maybe you want to refresh your living room, update your bedroom, or just add a little personality to your kitchen. The right touches make your home feel more welcoming, more “you.”

This guide dives into practical ways to upgrade your space—no major renovation required. You’ll find real product suggestions and tips that actually work in everyday homes.

Each idea here focuses on changes that give you the most visual bang for your buck (and effort).

Key Takeaways

  • Switch up lighting, add textiles like throw pillows and rugs, and refresh your walls with art or paint for instant room upgrades.
  • Try replacing cabinet hardware, swapping bathroom fixtures, or adding plants—these small changes can elevate your space without spending much.
  • Tackle one or two upgrades at a time to spread out costs, and pick items that vibe with your current decor style.

Lighting Makeovers That Transform Ambiance

Lighting really changes how a room feels—maybe more than any other affordable upgrade. Smart bulbs, statement fixtures, under-cabinet strips, and layered table lamps can totally shift your space’s mood, and they’re easy on the energy bill too.

Upgrade to LED Bulbs and Smart Lighting

LED bulbs use about 75% less energy than old-school incandescents, and they last way longer. You’ll see the difference on your electric bill and in the quality of light.

Smart lighting takes things up a notch. You can control brightness and color temperature from your phone, set schedules, dim the lights for movie night, or switch to warmer tones in the evening. Most smart bulbs play nice with Alexa or Google Home.

Dimmer switches give you manual control over how intense your lighting feels. They usually cost $15–$40 per switch and work with most LED bulbs.

Adjusting lighting for the time of day or activity lets you create the exact mood you want. It’s a small change with a big impact.

Product suggestions: Philips Hue White and Color Ambiance bulbs (about $50 for a starter kit), LIFX smart bulbs (no hub, $45–60), or Lutron Caseta dimmer switches ($25–35).

Incorporate Statement Lighting: Pendant Lights and Chandeliers

Statement lighting acts like functional art. A great pendant or chandelier draws the eye and adds personality to spaces that might otherwise feel a little blah.

Pendant lights work over kitchen islands, dining tables, or entryways. They hang from the ceiling and come in tons of styles—industrial metal, woven rattan, you name it. Decent options start at $80–150.

Chandeliers aren’t just for formal dining rooms anymore. Modern ones with geometric shapes or mixed materials like brass and wood fit right into casual spaces. Plenty of plug-in options exist if you don’t want to mess with wiring.

When picking statement lighting, think about the size. A pendant should be about one-third the width of your table. Chandeliers need enough clearance above head height so you’re not bumping into them.

Install Under-Cabinet Lighting

Under-cabinet lights get rid of shadows on kitchen counters, making prep work safer and easier. LED strip lights are a favorite—they’re thin, energy-efficient, and barely get warm.

You can go with plug-in strips or battery-powered puck lights. Plug-in strips stay bright and you don’t have to worry about batteries. Battery pucks are easier to install and don’t leave cords dangling.

Both usually have sticky backs for easy mounting. Under-cabinet LED strips run $20–$60, depending on length.

Look for a color temperature around 3000K for a warm white that’s not too harsh. Some strips even have dimming or motion sensors for extra convenience.

Most DIYers can install these in 30 minutes or less. Just clean the cabinet, stick the strips, and plug them in or pop in batteries.

Add Table Lamps for Layered Illumination

Table lamps add warm light at eye level, making rooms feel cozier. If you only use overhead lighting, things can feel a bit flat or sterile.

Try lamps on end tables, bookshelves, nightstands, or even kitchen counters. Mixing light sources at different heights adds depth and interest.

Quality table lamps often start at $30–50, and ceramic bases are tough and affordable. Swapping out a lampshade can totally change the vibe for under $20.

Go bold with patterned shades or keep it simple with neutral linen. The shade material makes a difference—linen diffuses light softly, while paper gives you sharper shadows.

Don’t be afraid to mix lamp styles in the same room. Maybe pair a ceramic base with a woven shade, or use two similar shapes in different finishes. You get to decide how bright or mellow each corner of your room feels.

Textile Upgrades for Coziness and Style

Textiles bring warmth and personality to any space—color, texture, and pattern work wonders. Swapping out pillows, bedding, curtains, or rugs gives a room a new look, no major reno (or spending spree) required.

Use Decorative Pillows to Add Color and Texture

Decorative pillows can totally transform a sofa, chair, or bed. Mix up textures like velvet, linen, faux fur, and cotton for a layered look.

Try three to five pillows in different sizes on a sofa—larger 22-inch ones in back, smaller 18-inch in front. Pick colors that play well with your furniture but add some energy.

If your walls and furniture are neutral, try bold jewel tones like emerald or navy. If the space is busy, go for subtle patterns or solids.

Budget tip: Grab pillow covers with zippers instead of full pillows. Reuse the inserts and swap covers seasonally for $15–20 each. Sets of four to six covers online are usually a better deal.

This way, you can change your room’s mood all year without storing a pile of bulky pillows.

Refresh Bedding with a New Duvet Cover

Switching out your duvet cover can change your bedroom vibe in minutes. Duvet covers slip over your existing insert and cost way less than buying a whole new comforter.

Good ones run $40–80 and look much pricier. Pick fabrics that suit you—cotton percale is crisp and cool, while sateen is softer and has a slight sheen.

Linen duvet covers add texture and get softer with every wash, but they do wrinkle. Large florals or bold geometrics make a statement in big bedrooms, while small rooms look better with subtle patterns or solids.

White or light gray covers give a hotel feel and match any decorative pillows you already have.

Update Window Treatments: Roman Shades and Curtains

Window treatments control light, give privacy, and frame your windows. Roman shades look neat and tailored, folding into horizontal pleats when raised.

Curtains soften the room and make ceilings seem taller if you hang them near the ceiling line. Mount rods 4–6 inches above the window, and let panels just kiss the floor or puddle a bit for a luxe look.

Light-filtering fabrics work well in living spaces where you want sun but also some privacy. Blackout curtains are better for bedrooms.

Try layering sheers under heavier drapes for more control over the light. Neutral colors like cream, gray, or soft blue play nicely with most decor and won’t clash if you switch things up later.

Elevate Floors with Area Rugs

Area rugs anchor your furniture and define zones in open layouts. Make sure the rug fits under the front legs of sofas and chairs, or under everything in smaller rooms.

Too-small rugs make rooms feel awkward. In living rooms, aim for at least 8×10 feet. Bedrooms need rugs that stick out 18–24 inches past the bed.

Material matters for looks and durability. Wool rugs last forever and resist stains, but they’re pricier. Polypropylene and other synthetics are tough, easy to clean, and cheaper.

Natural fiber rugs like jute or sisal add texture but feel rougher underfoot. Stick to low-pile or flatweave in high-traffic spots so no one trips and vacuuming stays easy.

Creative Wall Art and Decorative Accents

Wall art can turn a blank wall into a statement. Simple things like gallery walls, peel-and-stick wallpaper, or floating shelves add character—no expensive remodel needed.

Create a Gallery Wall for Personalized Impact

Start with three to five frame sizes for a balanced base. Mix 8×10, 11×14, and 16×20 inch frames for variety.

Put your biggest frame at eye level, about 57–60 inches from the floor, and arrange the smaller ones around it. Mixing frame styles adds personality—maybe modern black with vintage gold, or wood with metal.

This keeps your wall from looking too matchy-matchy. Choose two to four colors that already show up in your room. Use one color for about 60% of your art, a second for 30%, and the rest for little pops of accent.

Personal photos make the wall feel like yours. Mix family pics with travel shots, local art, or quotes you love.

Lay everything out on the floor first to test arrangements before you start hammering nails. Trust me, it saves a lot of patching later.

Apply Peel-and-Stick Wallpaper for an Instant Makeover

Removable wallpaper gives you style without the stress of commitment. It goes on easily and comes off clean, so it’s perfect for renters or anyone who likes to switch things up.

Focus on just one accent wall for the biggest impact—like behind your bed or sofa. Bold patterns really shine when they define a space.

Large geometrics or vibrant florals work well in living rooms and bedrooms. For smaller rooms, avoid oversized prints that can make things feel crowded.

Pick a wallpaper that fits your color scheme. Test samples first to see how they look in different lighting.

Popular brands offer tons of designs at all price points. Don’t be afraid to experiment a little—sometimes the riskier patterns end up being your favorite part of the room.

Use Floating Shelves to Showcase Decor

Install floating shelves to add storage and display space without bulky furniture. They work in any room and usually cost way less than bookcases or cabinets.

Mix books with decorative objects for interesting displays. Layer smaller items in front of larger books for some depth.

Add ceramic vases, framed photos, small plants, or collectibles that really show off who you are. Vary shelf heights to keep things visually interesting.

Try installing shelves at different levels instead of sticking to straight lines. This staggered look feels more relaxed and lets you display items of all sizes.

Pick slim shelves for narrow spaces like hallways. You can even put shelves above existing furniture to use up empty wall space.

Corner shelves work great in spots where regular furniture just won’t fit.

Product suggestions:

  • IKEA LACK floating shelves (available in multiple sizes and colors)
  • Command Picture Hanging Strips (damage-free hanging solution)
  • Tempaper Removable Wallpaper (wide pattern selection, easy application)

Affordable Furniture and Hardware Updates

Small furniture additions and hardware swaps can quickly refresh your space. You don’t need much effort, but the impact is real—both in style and function.

Swap Out Cabinet Hardware for a Modern Look

Cabinet hardware is like jewelry for kitchens and bathrooms. Swapping out old knobs and pulls takes less than an hour and instantly changes the vibe.

Matte black hardware runs $2 to $8 per piece and fits modern spaces. Brushed gold or brass, usually $3 to $10, brings warmth to traditional kitchens.

Chrome or nickel finishes are a safe, timeless bet at similar prices. You’ll just need a screwdriver for most installations.

Measure your existing holes before buying new hardware to avoid extra drilling. Most pulls are spaced 3 inches apart, and knobs use single holes.

Product suggestions:

  • Liberty Hardware 3-inch bar pulls in matte black
  • AmazonBasics brushed nickel cabinet knobs
  • GlideRite 5-inch modern pulls in champagne bronze

Add Small Furniture Pieces for Function and Flair

Small furniture fills empty corners and adds storage without making things feel crowded. A slim console table behind your sofa gives you a spot to display things and usually costs $80 to $200.

Accent chairs in the $150 to $300 range add extra seating and a pop of color. Storage pieces like ladder shelves or cube organizers keep things tidy and double as decor.

Closet organizers can turn chaos into order. Rolling carts are lifesavers in kitchens, bathrooms, or home offices and often cost under $100.

Look for pieces that do double duty. Ottoman storage benches hide clutter and offer a place to sit. Nesting tables give you extra surfaces when you need them, then tuck away easily.

Budget-Friendly Kitchen and Bathroom Enhancements

Kitchens and bathrooms can start looking tired fast, but you really don’t need a full reno to freshen things up. Little changes like a new backsplash, fresh caulk, or updated switch plates can make a big difference.

Install Peel-and-Stick Backsplash for Style

A backsplash brings personality and keeps your walls safe from splashes. Peel-and-stick tiles are an easy, affordable way to upgrade without hiring anyone or dealing with grout.

You’ll find all kinds of styles—subway tile, geometric patterns, faux ceramic, glass, or stone. Most packs cost $15 to $40 and cover about 10 square feet, which is usually enough for behind a stove or sink.

Installation’s pretty simple. Clean the wall, measure and cut, peel and stick. You can even use these tiles in bathrooms as a quick accent.

Top product suggestions:

  • Tic Tac Tiles – Realistic subway tile patterns starting at $20
  • Art3d Peel and Stick Backsplash – Heat-resistant options perfect for behind stoves
  • Commomy Hexagon Tile Stickers – Modern geometric designs for contemporary kitchens

Refresh with Fresh Caulk and Towel Bars

Old caulk makes even the cleanest bathrooms look dingy. Scrape away the old stuff and add a fresh bead along tub edges, shower seams, and sinks for less than $10.

Use a caulk removal tool, clean the area with rubbing alcohol, and apply a thin line of silicone caulk. Smooth it out with your finger or a tool, then let it dry for a day before getting it wet.

New towel bars add both function and style. Matte black, brushed nickel, or brass finishes can match your faucets and hardware. Good towel bars usually run $15 to $35 each online or in stores.

Replace Switch Plates for a Polished Finish

Switch plates are easy to overlook, but once you notice dirty or cracked ones, you can’t unsee them. Swapping them out in your kitchen and bathroom takes less than half an hour and costs just a few bucks per plate.

Sure, basic white plates work, but why not upgrade? Stainless steel looks sharp in modern kitchens, while brass or bronze fits traditional spaces. Glass or ceramic can tie in with your backsplash or counters.

First, turn off the power at your breaker box. Unscrew the old plates, pop on the new ones, and make sure everything matches for a put-together look.

Smart Home Touches and Practical Tips

Smart devices can add convenience and a modern feel without blowing your budget. A smart thermostat or lock brings real upgrades to your day-to-day life, no major renovation needed.

Upgrade to a Smart Thermostat for Modern Comfort

Smart thermostats let you control your home’s temperature from your phone and help save on energy bills. They learn your routine and adjust heating and cooling on their own.

You can set different temps for different times, or tweak things when you’re out. Installation usually takes 30-45 minutes if you’re replacing an old thermostat.

Most models work with standard systems. The Ecobee comes with room sensors to balance temperature throughout your place.

Smart thermostats display weather, time, and temp on a sleek touchscreen. They even give you monthly energy reports and tips to save more. Expect to pay $120-250, and you might see 10-23% savings on your energy bills—these things can pay for themselves in a couple years.

Add a Smart Lock for Security and Convenience

Smart locks replace your deadbolt and mean you don’t have to fumble for keys. Unlock your door with your phone, a keypad, or even by voice if you’re into smart home setups.

Handy for guests, cleaners, or contractors—you can make temporary codes without making extra keys. You’ll get notifications when someone unlocks the door, which adds a bit of peace of mind.

Most smart locks only need a screwdriver and take 15-30 minutes to install. They fit standard doors, so you shouldn’t need to drill anything new. Battery-powered options mean no wires, and prices usually range from $100-300 depending on features.

Simple Curb Appeal Boosts

Your home’s exterior sets the tone for visitors and neighbors. Swapping out house numbers and doing some quick landscaping can really freshen things up without much work or money.

Update House Numbers for Modern Style

New house numbers give your place an instant update. Pick numbers that contrast with your door or siding for better visibility—black for light houses, brass or gold for dark ones.

Modern house numbers come in all sorts of styles:

  • Floating numbers: Attach with hidden hardware for a clean look
  • Plaques: Classic, with all numbers grouped together
  • Vertical layouts: Great for narrow entryways
  • LED-backlit: Light up your address at night

You’ll find good options for $20 to $50. Go for at least 4-inch numbers so people can actually see them. Clean the spot before you install, and use a level to keep things straight.

Try Simple Landscaping for a Welcoming Entry

Basic landscaping can totally change your front yard. Trim back overgrown bushes, pull out any dead plants, and lay down fresh mulch for a cleaner look. A couple of inches of mulch usually costs $25-40 for most yards.

Brighten things up with flowers in pots by your door. If you want low-maintenance, try:

  • Petunias: Lots of color all summer, love the sun
  • Hostas: Perfect for shade
  • Marigolds: Tough and handle heat well

Define your walkway with stone or metal edging. Keep weeds in check and mow the lawn regularly. These little things add up and make your place way more inviting.

Frequently Asked Questions

Upgrading your home on a budget brings up a lot of practical questions. Lighting, textiles, wall art, and compact furniture can all transform a room—no expensive reno required.

What are some budget-friendly lighting options that can enhance a living room’s ambiance?

LED strip lights are a cheap way to add a cozy glow under shelves or behind furniture. Decent sets run $15 to $30 and stick on easily. They make a living room feel warmer and more welcoming.

Table lamps with fabric shades add both light and a little style for $25 to $60. Try to find ones with adjustable brightness so you can set the mood. Mixing lamp heights around the room helps prevent harsh overhead lighting.

Floor lamps with arched arms fit nicely in corners or behind chairs. They’re usually $40 to $100 and don’t take up much space. Go with LED bulbs to cut electricity costs by up to 75% over old-school bulbs.


Can you suggest practical textile upgrades for boosting comfort and style in a home?

Throw pillows are a quick win—mix up textures and patterns for $10 to $25 each. Velvet, linen, and cotton blends all feel different and keep your seating area interesting.

Area rugs help define spaces and add warmth to hard floors. You can grab decent rugs at IKEA or Wayfair starting at $50 for small sizes. Make sure the rug extends at least 6 inches past your furniture for the best look.

Light window treatments let in sunshine but soften up bare windows. Roman shades or sheer curtains usually cost $20 to $60 per window. Bamboo blinds are another solid choice and add a bit of texture.

Throw blankets tossed over furniture add comfort and style for $15 to $40. Chunky knits or faux fur give a little texture, especially in minimalist rooms. Keep them handy for chilly days—they’re not just for looks.


How can one incorporate wall art to revitalize a room without overspending?

Gallery walls with a mix of framed prints can totally change the feel of a room for under $100. Print high-res images at home or use an online service for just $2 to $5 each, then grab affordable frames from discount shops.

Arrange the frames in odd numbers and switch up the sizes for a more lively, less predictable look. It’s a simple trick, but it works wonders.

Large canvas prints can make a bold statement without breaking the bank. You’ll find online retailers selling prints up to 24 by 36 inches for $30 to $60.

Hang one big piece above a sofa or bed. It anchors the wall and draws your eye upward, making the whole space feel more intentional.

Wall decals and removable wallpaper panels add pattern and personality, but you don’t have to commit forever. These usually run $15 to $50, so they’re renter-friendly.

Stick to one accent wall with these to keep things balanced. Too much can overwhelm the space, but a single wall? That’s just right.

Floating shelves can break up blank walls and give you a spot to display your favorite objects. A set of three shelves usually costs $30 to $60, which isn’t bad for the impact.

Mix in books, plants, and small art pieces. Play around with the heights to keep it feeling balanced but not too staged.


What small furniture pieces make a big impact on a room’s aesthetic at a low cost?

Accent chairs bring in color and extra seating, usually for $100 to $200. Hunt for compact chairs that tuck into corners or sit by windows without crowding the room.

Chairs with unique shapes or bold fabrics can really pop, even if the rest of your furniture is pretty neutral.

Ottomans are the unsung heroes—footrest, extra seat, or even a coffee table if you need one. You’ll find round or square ottomans with storage for $50 to $100, which helps cut down on clutter.

Try placing one in front of your sofa, or use two smaller ones instead of a traditional table. There’s no rulebook here.

Console tables slip behind sofas or into entryways, giving you surface space without hogging the floor. Narrow options run $60 to $120 and usually measure 10 to 12 inches deep.

Style them with a lamp, a plant, or a decorative tray. It’s an easy way to make a space feel intentional without much effort.

Nesting tables are surprisingly handy, especially if you like to entertain. A set costs $40 to $80, and you can tuck them away when you don’t need them.

Pull them out for extra surface area, or stack them for a layered look. Their different heights add a bit of dimension to your setup.


What are the latest trends in living room design that are both stylish and affordable?

Neutral color palettes with warm undertones are edging out stark whites and cool grays these days. Think beige, taupe, and warm white for a calming, modern vibe.

Layer in natural wood tones and a few black fixtures for contrast. It’s subtle, but it makes a difference.

Curved furniture and rounded edges are popping up everywhere. Affordable curved-arm chairs or round coffee tables bring in those softer shapes.

In small spaces, these curves help a lot—hard corners can make things feel cramped, don’t you think?

Natural materials like rattan, jute, and wood add texture and warmth. Woven baskets for storage cost about $15 to $40 and look great while keeping things tidy.

These materials just seem to work with neutral palettes, adding interest without needing loud colors.

Maximalist touches are making a comeback, but you don’t have to go all in. Try a patterned rug or a set of colorful pillows to dip your toes into the trend.

Mix patterns in similar color families if you want things to feel cohesive. It’s a fun way to shake up your space without too much risk.


Could you recommend affordable home decor products that offer a luxurious feel?

Brass or gold hardware on cabinets and drawers instantly gives your space a high-end vibe for just $3 to $8 per piece. Swapping out old hardware is quick—you really just need a screwdriver.

Matte brass feels a lot more modern than those super shiny gold tones, honestly.

Faux fur or velvet throw pillows bring in texture that’s pretty close to the real thing. You can usually find good faux options at HomeGoods or Target for $15 to $30, and they actually look convincing up close.

I’d stick to rich colors like emerald, navy, or burgundy if you want that luxe look.

Framed mirrors with decorative borders can make a small space feel bigger and a bit more elegant. Try to find mirrors with metal frames in trendy finishes—usually $40 to $80.

Hang one across from a window and you’ll get more natural light bouncing around, which just makes the whole room feel lighter.

LED candles in glass holders give you that cozy ambiance but without any waxy mess.


Style a Small Living Room: Make Spaces Feel Open & Inviting

0

A small living room doesn’t have to feel cramped or cluttered. With the right furniture, smart layouts, and thoughtful color, you can turn even the tiniest space into a room that feels open, airy, and honestly, just more comfortable.

The real trick? Work with your space, not against it.

People often think small living rooms mean giving up style or comfort. That’s just not true.

By sticking to a few basic ideas—like picking furniture that fits, using light colors, and keeping layouts simple—you can make a space that looks great and actually works for you.

  • Pick furniture with legs and lighter colors to open up your room visually
  • Go for multipurpose pieces and vertical storage to keep things functional but not crowded
  • Layer lighting and add mirrors to bounce natural light around and make everything feel bigger

Assessing Your Space for Optimal Layout

Before you buy anything, really look at your room. Measure it—length, width, and height matter—and pay attention to how people actually move through the space.

Mapping out traffic patterns helps you make smarter choices about where things go. It’s way easier to create a living room that feels open if you plan ahead.

Measuring and Planning for Functionality

Grab a tape measure and jot down your room’s size. Don’t forget to note where windows, doors, outlets, and any weird permanent stuff (like radiators) are.

Draw a quick floor plan on paper or use a free app—nothing fancy, just something to help you visualize. Mark which way doors swing open since that’ll mess with where you can put things.

Pay attention to where sunlight comes in during the day. That’ll matter later.

If you already have furniture, measure that too—or check the sizes of anything you’re thinking about buying. Leave at least 30 to 36 inches for main walkways and about 14 to 18 inches between the sofa and coffee table.

Pick a focal point for the room, like a fireplace, a big window, or maybe the TV wall. Arrange your furniture so it faces that spot and gives the room a sense of purpose.

Defining Walkways and Traffic Flow

Think about how people naturally come and go in your living room. Keep the main pathway clear so no one has to shimmy past a coffee table or trip over a chair.

Try for at least 30 inches of space in your main traffic lanes. If your living room connects to other rooms, don’t block those in-and-out routes with furniture.

If it helps, use painter’s tape to outline where you want furniture to go. Walk through the space a few times—does it feel natural? If not, tweak it.

Creating Visual Zones in Compact Areas

Even in a small living room, you can carve out “zones” without building walls. An area rug can anchor your seating area and make it feel separate from, say, a dining nook.

Arrange furniture so each area has a purpose. Face a sofa and chairs toward each other for chatting, or aim everything at the TV if you’re more about movie nights.

Use low furniture or open shelving as gentle dividers. A console table behind a sofa or a bookshelf set sideways can separate spaces without blocking your line of sight.

Smart Furniture Selection and Placement

The right furniture (and where you put it) can totally change the vibe of a small living room. Focus on pieces that fit the room’s size and, ideally, do more than one job.

Arrange them so people can actually move around without bumping into everything. It makes a huge difference.

Choosing Scaled and Low-Profile Pieces

Pick furniture that matches your room’s size. Big, bulky pieces just eat up space and make it hard to move.

Measure before you shop. Compact sofas—think 60-72 inches wide—work better than the standard giant ones.

Armless sofas and chairs are lifesavers in tight spaces. They take up less visual space and keep things feeling light.

Low-profile furniture with exposed legs lets you see more floor, which somehow just makes everything feel bigger.

Some good options:

  • Compact sofas (60-72 inches wide)
  • Armless chairs that fit into corners
  • Furniture with legs at least 4-6 inches high
  • Shallow seating (28-32 inches deep)

Skip the huge recliners or massive sectionals unless you’re sure they’ll actually fit. Sometimes a small accent chair plus a properly sized sofa is all you really need.

Multifunctional and Double-Duty Furniture Choices

Multifunctional furniture is a game changer. A sofa bed lets guests crash without needing a guest room. Storage benches? You get extra seats and a place to stash blankets or random stuff.

Ottomans can be footrests, extra seats, or coffee tables—just throw a tray on top. Look for ones with hidden storage inside if you can.

Nesting tables are great too. Stack them when you’re not using them, spread them out when you need more surface space.

Popular double-duty picks include:

  • Storage ottomans with lift-up lids
  • Coffee tables with shelves underneath
  • Console tables that convert to dining tables
  • Behind-the-sofa storage units that double as room dividers

Optimal Arrangement Tips for Small Spaces

Don’t shove all your furniture against the walls. Floating pieces a few inches out can actually make the room feel bigger.

Arrange seating to encourage conversation, not just TV watching. Angle an accent chair for a little visual interest.

Try to keep walkways at least 24-30 inches wide. It’s just more comfortable.

Start with your biggest pieces, then fill in with smaller stuff like nesting tables or poufs. Use tall, narrow shelving to draw the eye up—makes the ceiling seem higher.

Mount your TV on the wall if you can. It frees up valuable floor space.

Maximizing Light and Visual Openness

Light changes everything in a small living room. The right mix of lighting, good window treatments, and some reflective surfaces can make your space feel way bigger than it is.

Layered Lighting Strategies

Don’t rely on just one overhead light. Layer in a few sources at different heights—overhead, wall sconces, table or floor lamps.

Overhead lights with dimmers let you set the mood. Wall sconces can push light up and make your ceiling look taller.

Put a lamp near your favorite reading spot or next to the sofa. A statement pendant can add some cool style without hogging floor space.

Try to hit three levels: ceiling, mid-level (sconces or table lamps), and low (floor lamps). This helps avoid dark corners that shrink the room.

  • Ambient: Ceiling fixtures with dimmers
  • Task: Reading lamps or desk lights
  • Accent: Wall sconces for up/down lighting
  • Statement: One decorative piece for flair

Maximizing Natural Light with Window Treatments

Skip heavy drapes—they just block out sunlight. Sheer curtains let in light but still give you privacy.

Mount your curtain rods close to the ceiling and use long curtains to draw the eye up. It’s a nifty trick to make the room feel taller.

Keep window sills clear. Even a little dust on the glass can cut light by a surprising amount. If you need more privacy, try roller shades or blinds that disappear when open.

Choose light-colored or white window treatments. They reflect more light around and keep things looking fresh.

Strategic Use of Mirrors and Reflective Surfaces

Hang a big mirror across from your main window. It’ll bounce natural light around and make the room look twice as big.

Mirrored coffee tables or furniture with shiny finishes also help. Glass and acrylic tables let light pass through, so they don’t weigh the room down visually.

Try to position mirrors so they reflect something nice—a window, a plant, or a lamp. Reflective surfaces like polished metal or lacquered finishes amplify your lighting without adding more lamps.

Color Palettes and Decorative Finishes

A small living room with light-colored walls and furniture, large windows letting in natural light, minimal decor, and plants, creating an open and airy atmosphere.

The right colors can make your small living room feel way bigger. Lighter shades bounce light around and open things up, while well-chosen colors keep the eye moving (and the clutter feeling low).

Embracing Neutral and Light Tones

Neutrals are your best friend here. Paint your walls in soft whites, light grays, or gentle beiges with a Light Reflectance Value above 60.

These shades bounce light and blur the edges of the room, so it doesn’t feel boxed in. Benjamin Moore’s Chantilly Lace or Sherwin-Williams Alabaster are nice picks—bright, but not cold.

Stick to light colors for your main furniture too—cream, taupe, or pale gray sofas and chairs help keep the whole look cohesive.

Keep your floors light as well. Pale wood or a neutral jute rug carries that airy vibe from top to bottom. Dark floors can look cool, but they do make a room feel a bit smaller.

Color Drenching and Limited Color Palettes

Color drenching is when you paint the walls, trim, and ceiling all in one shade. It’s a trick that can make your living room feel bigger, since your eye just glides around without stopping at contrasting edges.

Pick one main color for the whole room. Light blue-grays like Benjamin Moore’s Glass Slipper or soft blush tones like First Light really suit this look.

Use that color everywhere—just switch up the finish. Maybe matte on the walls, satin on the trim, and so on. That way, you get a bit of subtle depth without losing the cohesive vibe.

A limited palette keeps things simple. Stick to two or three colors max. It helps avoid that chaotic, cramped feeling in a small space.

Your base neutral counts as one color, so you’re really only adding one or two accent shades. That’s plenty.

Play with finishes within your color family. Matte on the walls, satin on the trim, and pull the same tone into your fabrics and a few decor pieces.

Adding Colorful Accents Thoughtfully

Colorful cushions add personality, but don’t go overboard. Two to four pillows in coordinating accent colors do the trick on your sofa.

Medium-sized pillows work better than those giant ones that just take over the space.

Try a geometric rug for pattern and interest. Pick one with your accent colors woven in, but keep the pattern simple and set it against a neutral base.

That way, it anchors your seating area without making the room feel heavy.

Layered lighting can really boost your colors. Table lamps with warm bulbs make neutrals glow, and wall sconces highlight your paint color while saving floor space.

LED strip lights behind furniture add depth and make the walls seem to pull back a bit.

Keep decorative objects to a minimum. Three small items grouped on a side table look intentional and tidy. More than that, and the clutter shrinks your space fast.

Stick to accent pieces in your chosen color palette to keep everything harmonious.

Strategic Storage and Space-Saving Solutions

Smart storage keeps your small living room clutter-free and saves precious floor space. Go for wall-mounted options, open displays, and furniture with hidden compartments to build an organized, open-feeling room.

Vertical and Wall-Mounted Storage Ideas

Use your vertical space. Install storage that reaches up, not out. Wall-mounted shelving can hold books, baskets, and decor without eating up the floor.

Tall bookcases draw the eye up, making the ceiling feel higher. Floating cabinets above the sofa or on empty walls stash away stuff you don’t use every day.

Practical vertical storage options:

  • Pegboards with hooks for hanging accessories
  • Stacked cube organizers that reach near the ceiling
  • Wall-mounted TV units with integrated shelving
  • Vertical ladder shelves that lean against walls

Corner shelving units fit into those awkward spots that usually go unused. They turn corners into handy storage zones and keep the room feeling open.

Open Shelving and Floating Shelves

Open shelving gives you storage without the heaviness of closed cabinets. Mount floating shelves at different heights to add dimension and display your favorite things in a tidy way.

Try floating shelves behind your sofa for books, plants, or photos. It’s a sneaky way to use dead space without blocking light or walkways.

Keep open shelves neat by using matching baskets or boxes for smaller items. You get the accessibility of open storage, but without the mess. Pick shelves that match your wall color so they blend in.

Hidden and Built-In Storage Features

Furniture with hidden compartments is a lifesaver in small living rooms. Ottoman coffee tables with lift-up lids stash blankets and remotes while giving you a spot to put your feet up.

Built-in seating along walls can hide drawers or storage under lift-up cushions. Window seats with storage underneath make the most of tricky spaces and offer extra seating.

Wall-mounted foldable desks drop down when you need them and disappear when you don’t. Console tables behind sofas with drawers keep everyday items out of sight. Room divider units with shelves can split up a space and give you storage on both sides—super handy in studios or open layouts.

Inspiring Design Examples & Product Suggestions

Real living rooms prove that smart choices can make tight spaces feel open and breezy. Let’s look at some actual examples with furniture, colors, and layouts that really work for small rooms.

Modern Minimalist Small Living Room

Modern minimalism keeps a small living room feeling open with clean lines and just the essentials. Try a low-profile sofa in light gray or beige to anchor the space without blocking sightlines.

Glass coffee tables are perfect—you can see right through them, so the floor looks uninterrupted.

Add a jute rug in natural tan to define the seating area. The round Safavieh Natural Fiber Jute Rug (6-foot diameter) softens sharp lines and adds texture without visual heaviness.

Nesting tables are a win for minimalism. The Nathan James Nesting Side Tables in light oak give you surfaces when you need them, but tuck away easily. Stick to white or soft gray walls, and limit decor to one or two bold pieces—maybe a big plant or an abstract art print.

Cozy Cottage and Farmhouse Inspiration

Farmhouse style can work in a small living room if you focus on light woods and creamy tones instead of bulky, dark furniture. A slipcovered sofa in white or ivory keeps the vibe bright and relaxed.

Layer in poufs for flexible seating you can tuck away. The Christopher Knight Home Tufted Velvet Ottoman Pouf in cream offers soft seating without eating up floor space. A jute rug under the coffee table brings cozy texture without clutter.

Pick furniture with turned legs or open bases so you can see the floor underneath. A glass coffee table with a simple wood frame mixes farmhouse charm with that airy, see-through feel. Stick to whites, creams, and light woods to keep things open.

Chic Urban Spaces with Reflective Accents

Urban small living rooms get a boost from mirrors and reflective surfaces. Place a big mirror opposite your window to bounce natural light and visually double your space.

A glass coffee table with a metal frame adds a modern touch and keeps things light. Nesting tables in metallic finishes—think brass or chrome—catch the light and look chic. The Kate and Laurel Celia Round Nesting Tables in gold add a bit of glam and extra surface area.

Pick one pouf in a bold jewel tone like navy or emerald as your accent, then keep everything else neutral. A jute rug grounds the space and keeps all the shiny surfaces from feeling cold. Mount floating shelves instead of bookcases to display your stuff without blocking the walls.

Finishing Touches: Art, Texture, and Personality

The final layer is what brings warmth and character without cluttering things up. Artwork, textures, and accessories finish the look but keep the space feeling open.

Gallery Walls and Statement Artwork

A gallery wall gives you visual interest with zero floor space lost. Rather than scattering little art everywhere, group it all on one wall for a strong focal point—especially nice above a sofa or on a paneled wall.

Use frames in the same color to keep things cohesive. White or black usually works best. Arrange pieces close together for more impact and less visual noise.

If a gallery wall feels like too much, just hang one big statement piece. A single oversized artwork draws the eye up and makes the ceiling seem taller. Hang it at eye level, about 57-60 inches from the floor to the center.

Try these placements:

  • Above the sofa as a central focal point
  • On the wall opposite the entrance
  • Against exposed brick for texture contrast

Woven and Natural Materials

Woven materials like rattan, jute, and seagrass add texture without heaviness. They bring warmth, and their open construction keeps things feeling airy. These touches soften modern rooms and add depth to neutrals.

Look for woven baskets that double as storage and decor. A big basket by the sofa holds blankets and adds a touch of nature. Smaller baskets on shelves keep clutter out of sight.

Try a rattan side table or woven pendant light for character without overwhelming the room. Natural tones blend with almost any palette and work with both warm and cool colors.

Softening with Rugs and Accessories

A geometric or jute rug anchors your seating area and adds some warmth underfoot. Make sure it’s big enough that at least your furniture’s front legs rest on it. That connects everything and helps the space feel bigger.

Light rugs with simple patterns work best—dark, heavy ones can make the room feel smaller. Jute in natural tones keeps things open and defines the seating area.

Keep accessories minimal and thoughtful. Two or three items on the coffee table is enough. Maybe a small plant, a stack of books, and a decorative piece. Use trays to corral little things and keep surfaces tidy.

Frequently Asked Questions

Small living rooms need some strategy—furniture placement, color, and layout matter a lot. With the right moves, even a tiny space can feel comfy and functional.

What are effective furniture arrangement strategies for a small living room area?

Put your biggest piece of furniture against the longest wall. That keeps the center open and makes it easier to move around.

Try floating furniture a few inches from the wall. It sounds odd, but it actually makes the room feel bigger by giving everything a little breathing room.

An L-shaped sectional in the corner maximizes seating without blocking pathways. Modular pieces you can rearrange are a smart bet.

Give yourself at least 18 inches of walking space between pieces. That way, it won’t feel crowded and you’ll keep traffic flowing nicely.


Which color schemes are best to enhance the feeling of space in a compact living space?

Light and neutral colors reflect natural light and make walls seem to recede. Whites, creams, light grays, and soft beiges are your friends here.

Paint the walls and ceiling the same light color to blur boundaries. It’s a simple way to make the room feel endless.

Layer two or three shades from the same color family. Use the lightest on walls, a medium for bigger furniture, and keep darker accents to a minimum.

Save bold patterns and bright colors for small accents like pillows or art. Too many competing colors can make a small room feel chaotic fast.


What are the key considerations when choosing furniture for a small living room to maximize space?

Pick furniture with legs that show the floor underneath—it opens things up and makes cleaning easier, too.

Look for pieces that do double duty, like ottomans with storage or sofa beds. Fewer pieces means more space.

Sleek, simple designs beat bulky, ornate pieces. Streamlined furniture takes up less visual space even if it’s the same size.

Measure your room and doorways before you buy. If it’s too big, it’ll make your space feel cramped the second it arrives.


How can you layout a small living room to accommodate a television without overcrowding the space?

Mount your TV on the wall to save floor space. It also lets you pick the perfect height for viewing.

Set your seating about 6 to 8 feet from the TV. That’s usually ideal in smaller living rooms and means you don’t have to push everything against the walls.

Use a slim media console or floating shelf under the TV for storage. They’ll hold your devices and accessories without hogging space.

If your layout is awkward, try putting the TV in a corner at an angle. It can actually help with traffic flow and creates a cozy viewing spot.


Are there budget-friendly decorating tips that can visually expand a tiny living room?

Hang a big mirror across from a window. It’ll bounce natural light around and make your view feel twice as wide.

You don’t need a pricey mirror—grab one from a discount store and it’ll do the trick.

Swap in sheer or pale curtains. Pull them back during the day and let your space soak up the sunlight.

Suddenly, your windows look bigger and the whole room feels brighter.

Try adding tall bookshelves or curtains that reach all the way to the ceiling. This draws your eyes up and tricks your brain into thinking the ceiling’s higher.

Keep things tidy and only hold onto what you actually use or love. Less clutter means the room feels more open and honestly, it’s just nicer to be in.

Lay down a light-colored area rug to mark out your seating spot. It helps anchor your furniture but still keeps everything airy and put-together.


Can you provide practical examples of small living room designs that are both modern and space-efficient?

Picture a 10×12 foot living room. You can fit a 72-inch loveseat against the long wall, then place two small accent chairs opposite it.

Add a 30-inch round coffee table—nothing too bulky. Toss a floor lamp in the corner, and you’ve got a complete, cozy setup.

In an open-concept studio, try using a low-back sofa as a room divider. Pop a console table behind it to create a sense of separation between living and sleeping areas, but don’t block the light or the view.

If you’ve got a narrow 8×14 foot room, arrange furniture along one long wall. A slim sofa and wall-mounted TV work well, and you can squeeze in an accent chair in an L-shape, keeping the other side open for walking space.

For a square 11×11 foot space, center a small sectional facing a wall-mounted TV. A glass coffee table keeps things airy, and floating shelves on either side of the TV add storage and some visual balance.

Prefer a minimalist look? Go for a 60-inch sofa and two cube ottomans that tuck under a console table. Wall-mounted lighting saves space, and you’ll still have flexible seating for four people without cluttering the room.